Showing posts with label tutorial. Show all posts

Friday, December 9, 2011

PINK SATURDAY - TOOL KIT PREZZIE

Decoupaged tool kit for the geek in your life (or your DIY drawer)
I'm sure everyone is like me: frantically busy, just a little broke, and therefore looking to give handmade prezzies (that don't look HOME made - there is a difference). So I thought a quick and easy project might be just the job! Perfect for anyone, and unusual too! It's a TOOL KIT!

This was inexpensive, but doesn't look too cheap (although the plastic case was a dead giveaway, hence the decoration)
This is just a cheap basic tool kit you'll find in most hardware stores, a good size for changing plugs and other small electrical stuff (women need to be able to do this too, lol) also poking holes in signatures for books, levering out staples, prising drawing pins out of walls etc.

Front and back prepared in exactly the same way - just change the positioning of the decorations

PREPARATION

As it's plastic, it's rather slick and not good for gluing, so sand a little first, just enough to roughen the surface (use an emery board if you don't have sandpaper).

DECORATION
  • Couldn't be simpler: leftovers of scrapbooking paper for the front and the back, cut to size. 
  • Collage the ticket on first, then overstamped some text (using Staz-On ink).
  • The dots were Punchinella (sequin waste) used as a stencil, stippled with acrylic paint. Move the stencil and stipple again, creating a drop shadow using a metallic paint. 
  • Finally, decoupage a vintage scrap image of a clown's head.
 I used PVA (white glue) throughout. Mod Podge is also good.

Next step: glue to the tool kit using a good quality strong glue such as Crafter's, Gorilla, Aleene's Tacky Glue or use double-sided tape. You don't want this peeling off at a later date.

Finishing touches: I ran a metallic gold pen round the edges, then applied a single coat of clear acrylic varnish for protection.

TIME TAKEN

Very fast - took around 2 hours including coffee and biscuits, and drying time!

pink saturday

Finally, please visit Beverly at How Sweet the Sound to see all the other wonderful Pink Saturday posts!

Monday, October 10, 2011

JOURNAL SPREAD

Cabinet card tucks into page pocket - copyright Susie Jefferson

Cabinet card tucked into pocket - copyright Susie Jefferson
Closeup of spread without cabinet cart - copyright Susie Jefferson


I can't remember if I posted about this journal spread already - so if I did, I apologise in advance (Senior moment, lol). This was published in Craft Stamper, and here's the instructions if anyone is interested in how I did the pocket (scroll down to the bottom of the page).

Sunday, October 9, 2011

NEW TUTORIAL - BACKGROUNDS FOR WORDPRESS & TYPEPAD

Wordress - Coraline template
I've just put a brief tutorial on to my Computery blog on how to add freebie backgrounds to WordPress and TypePad blogs.

Hope it helps - now you can make your blogs more spiffy too!

You'll notice it's the identical background I've used on Blogology (which is where you'll find the coding for the background - see the post below as well) and I'm using WordPress's freebie template 'Coraline'.

FREE BLOG BACKGROUND - HORROR SHOW 2011

HORROR SHOW 2011 - freebie background from my Blogology blog
Here's my Halloween background (also for any Goths, horror movie fans etc) which I've tweaked for 2011 - the background is wider to accommodate bigger monitors (it's 1800 pixels wide) and with extra helpings of horror added, lol.

Just copy and paste all the code below into an html box in your sidebar.
<style type="text/css">
body {background-image: url("http://i659.photobucket.com/albums/uu313/1stFloorFlatComputery/21d26b6a.jpg"); background-position: center; background-repeat: no-repeat; background-attachment: fixed; }
</style>
<div id="tag" style="position:absolute; left:0px; top:50px; z-index:50; width:150px; height:30px;">
<a href="http://1stfloorflatblogology.blogspot.com/" target="_blank">
<img border="0" src="http://i659.photobucket.com/albums/uu313/1stFloorFlatComputery/9061ddc2.png"/>
</a></div>

HEADER

980 pixels wide
If you want to customise my header with your own text, right-click the picture to open to full size then left-click to save to your own computer. Add text using your favourite graphics programme, then load up and click' Instead of Title and Description'.

Otherwise, just save the header and click 'Behind Title and Description' to use Blogger's own default header text - or copy the code below and enter that instead.
http://i659.photobucket.com/albums/uu313/1stFloorFlatComputery/5b722a63.png

For standard header widths, see my earlier version here: HORROR SHOW

PERFECT POSITIONING:

Here's how to centre the heading in the older templates (eg: Minima), and here is the tutorial for centering the header and removing that bar at the top that shows behind the header in some templates (eg: Simple, Watermark).

Tuesday, July 19, 2011

BLOGGER - the latest hiccup

Copyright-free image from Tack-o-Rama
Just to let you know - the latest hiccup with Blogger isn't Blogger itself - it's the latest versions of Internet Explorer.

Pages link bar on Firefox - all the links are there
Internet Explorer - only the Home page shows
If you use IE, you may want to check whether your Pages widget is showing as it should. If you set it to be horizontal in a line under the header, you may well find it showing veritcally, with one link under the other, instead of side by side. Or - as with mine - you may find they don't show up AT ALL! It's enough to make you tear your hair out!

Copyright-free image from Tack-o-Rama
However, here's a way to sort it out once and for all - put in your own text links.

First thing to do click on each page, so you have them all up on show in separate tabs, so you can switch backwards and forwards to get the codes easily. If you are on IE, and it insists on bringing up a new blog every time, try this: press the CTRL key + the link, and your page should open up in a new tab.

Next thing to do is go to your Dashboard and then Design > Page Elements view, click on Add a Widget and add an html widget under your header.

ADDING AN EXTRA WIDGET UNDER YOUR HEADER

Some of you (with certain of the new Design Templates) may find that Blogger refuses to let you do it, so you'll have to click on Edit HTML in your blog and actually get in there and change a little coding, to add an extra widget. It's always best to download a copy of your blog to your desktop, just in case...

Now you need to type in CTRL + F on your keyboard while in Edit HTML view - and you'll see the 'Find' box in a toolbar right at the bottom of your screen, just above your Start button.

Type: 
<b:section class='header' 
into the box, and you'll be taken to the correct section of code in your blog, which will highlight for you in green.

This is what you will see:
<b:section class='header' id='header' maxwidgets='1 showaddelement='no'>
You need to change the number of widgets to 3 (on some blogs, 2 is enough - but 3 works on ALL blogs) and 'no' to 'yes' - your code will now look like this:
<b:section class='header' id='header' maxwidgets='3 showaddelement='yes'>
Save it. Now when you go to Page Elements view, you'll see some new widget bars (one above your header, and one or two below it - OR - you'll find when you drag&drop an html widget into the same space as your Pages widget, that the blog will accept it.).

SORTING OUT A TEXT LINK BAR

Into your new html widget, you'll need to enter each page as a separate link.
<center>
<h2>
<b>
<a href="URL OF YOUR PAGE" target="_blank">Name of Page</a>
nbsp;
nbsp;
<a href="URL OF YOUR PAGE" target="_blank">Name of Page</a>
nbsp;
nbsp;
<a href="URL OF YOUR PAGE" target="_blank">Name of Page</a>
</b>
</h2>
</center>
I've done two for you, separated by Non Breaking Spaces (so they will line up horizontally next to each other). Just copy&paste as many links as you need. I've entered the coding vertically to make it easier to work with, but I promise you the link will display horizinally when 'live'.

The important thing to remember is to leave no spaces between the " symbols when entering the URL of each page address.

You'll see I've added this piece of code:
target="_blank"
This will make each link open into a separate tab. If you don't want that, just delete it.

Once you've checked you have entered all the page links, test them out - and THEN delete your Pages widget.

Copyright-free image from Tack-o-Rama
SUGGESTION

If you have a big blog, with tons of links and content, why don't you copy the entire contents of your new widget and create another html widget in your Footer area. Then people won't have to scroll back up to the top of your blog to navigate.

I hope this helps! (and I'll be archiving this post onto Computery).

Tuesday, July 12, 2011

GUEST POST SPOT

Copyright Susie Jefferson using an image from Tack-o-Rama
Thanks so much to Krista at While He Was Napping
- I was thrilled to be asked to write a guest post!
Success at last, lol lol lol

So if you always wanted your own email button, but didn't know how to do it, now you do! And here's the link on my own Computery blog.

Go for it, you know you can do it!

Friday, July 8, 2011

PINK SATURDAY - DESKTOP SCREEN SAVER & TUTORIAL

The screensaver I've designed - icons wherever you want them to go
(copyright Susie Jefferson)

This week, I decided to get my desktop organised. 

I've been reading a book from the library on how to care for your computer, cosset it, generally keep it happy - and discovered to my horror that my beloved Active Desktop Screensaver (which I've had for years) is Not A Good Idea!

My old desktop screensaver - Active Desktop Calendar to
the right, and all my icons on the left in orderly rows
These use up loads of memory, and if your computer is temperamental and on the old side (yes, to both) then you really shouldn't have anything active on your desktop. No fancy stuff apart from icons. Well, I don't know about you - but I find the screensavers that come with my computer programme (Windows XP) are beyond boring!

Screensaver at 1680 x 1050 resolution
Click here for the direct download
Screensaver at 1800 x 1050 resolution
Click here for the direct download
So I decided to make my own desktop calendar page for August, and here it is if you'd like to download it too. Left-click to open the folder at full size then right-click to save to your computer OR use the direct download links under the pictures.

TUTORIAL

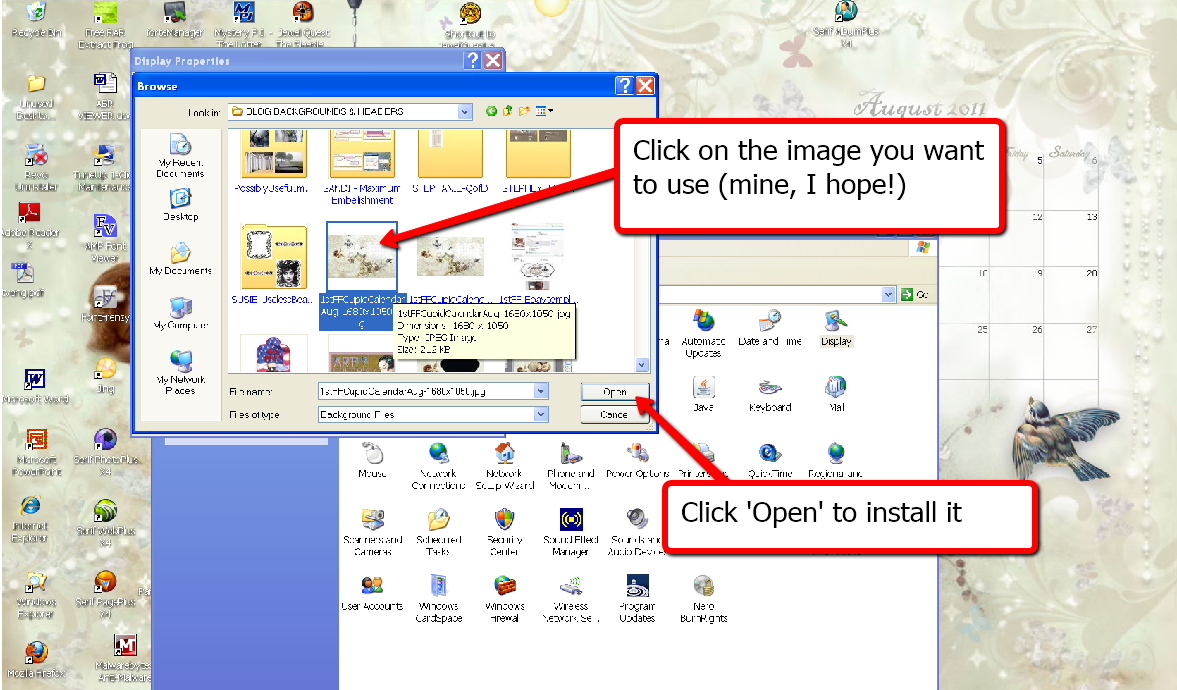
Here's how to install your own screensaver - and also put your icons where you want them!


NOW ARRANGE YOUR DESKTOP ICONS WHERE YOU WANT THEM:


It's even easier than it looks! And if you want all your icons ordered into a grid or auto arranged - just tick the boxes again.Hope you like the screensaver and find it and the tutorial useful.

To enter your own notes and dates the easy way, either use your favourite graphics programme - or go to my Computery page and have a look at all the free programmes out there. Some you don't even need to download! And here's how to add a text layer:


pink saturday

Finally, please visit Beverly at How Sweet the Sound to see all the other wonderful Pink Saturday posts!

Sunday, May 1, 2011

MY NEW VIDEOS - FOR COLOURICIOUS


Just before Christmas, I was over at my friend Jamie's house, having a play day, and Jamie photographed my process using wooden print blocks. So here are the videos! 

If you want to see the how-to for the pink box, here's the tutorial I did earlier.

This one is a tutorial for a simple 3-hole pamphlet bound book. You'll see I also created all the pages, so the book is complete - all it needs is a bit of journalling. As I used acrylics (which dry waterproof) the pages are safe to collage, paint, glue, distress...


When doing the stitching, start at the centre hole (from the inside or outside of the book, your choice) then go up to the next hole. Bring the thread down to the last hole (missing out the centre hole) and then finish off by stitching through that centre hole again. Postion the thread so one end is one either side of the length of thread you just stitched, and tie off by trapping that central thread between the two ends. Use a square or Reef knot (right over left, left over right) and trim close to the knot. Press down on the knot with a bone folder to flatten. That's it!

Jamie is the brains behind Colouricious - if you haven't seen their excellent YouTube videos and craft DVDs, you are really missing something!

Here, I was using acrylics and gesso - just make sure you clean your blocks or stamps continuously, because once this stuff dries, it's permanent. (I plonk mine image-side down on a damp flannel, sponge, wad of kitchen paper, to keep the surface moist till I'm ready to clean up.)

Wednesday, January 26, 2011

MORE SCRAPBOOKING VIDEOS

I've finally managed to post the rest of my videos (20 in all!) which you'll find on the Videos page (link under the blog header).

I've put up the YouTube versions (without adverts) but if you are hard of hearing go to the original VideoJug site, which has printable transcriptions.

Here are the videos on hybrid and digital scrapbooking, which are all the rage at the minute!


A guide to hybrid scrapbooking


How to begin digital scrapbooking


Here's the link on VideoJug (who did the filming) where they supply a printable version with links to all the sites I mention in the Digital Scrapbooking video.

Monday, December 6, 2010

CHRISTMAS SHELF EDGING & COFFEE FILTER WREATH TUTORIALS

Kitchen lights - bet Peter won't be happy about the nail holes in the shelf edge!
Closeup - note I actually strung all the little baubles. Talk about fiddly!
Sometimes I just can't leave well enough alone, so decided to put some Christmas lights in the kitchen this year.

I'm actually yearning for lit-up chilli peppers or something food related, but not being willing to spend around £30 ($50) for one string of only 10 lights, these had to do instead. Plus a few extra danglies I happened to have spare - they just wouldn't fit on the tree!

PUNCHED SHELF EDGING

Copyright Susie Jefferson for Blade Rubber Stamps

This pic shows a shelf liner edging I did as part of a tutorial I wrote for Blade Rubber Stamps - just scrapbooking paper cut into strips, then joined up into one long length - and two punches. Easy peasy - and quick! So you might like to have a go at that one. Full instructions are here.

Seeing the pix again, I wish I'd done this first, then added the lights. Too late now!

COFFEE FILTER WREATH

Copyright HappyDotMom
Just found this! Isn't it fabulous? It's a polystyrene base and a ton of COFFEE FILTERS! Love it, love it, love it!

Go here to see the full tutorial by Lilly at HappyDotMom.

I think I'd have to meddle though... surely there's room somewhere for a set of lights as well? Even if it's just teeny little LED ones? Or maybe just a teensy spot of glitter.... (sorry, sometimes I just can't help myself...)

Sunday, December 5, 2010

FABULOUS CREPE PAPER TREE TUTORIALS

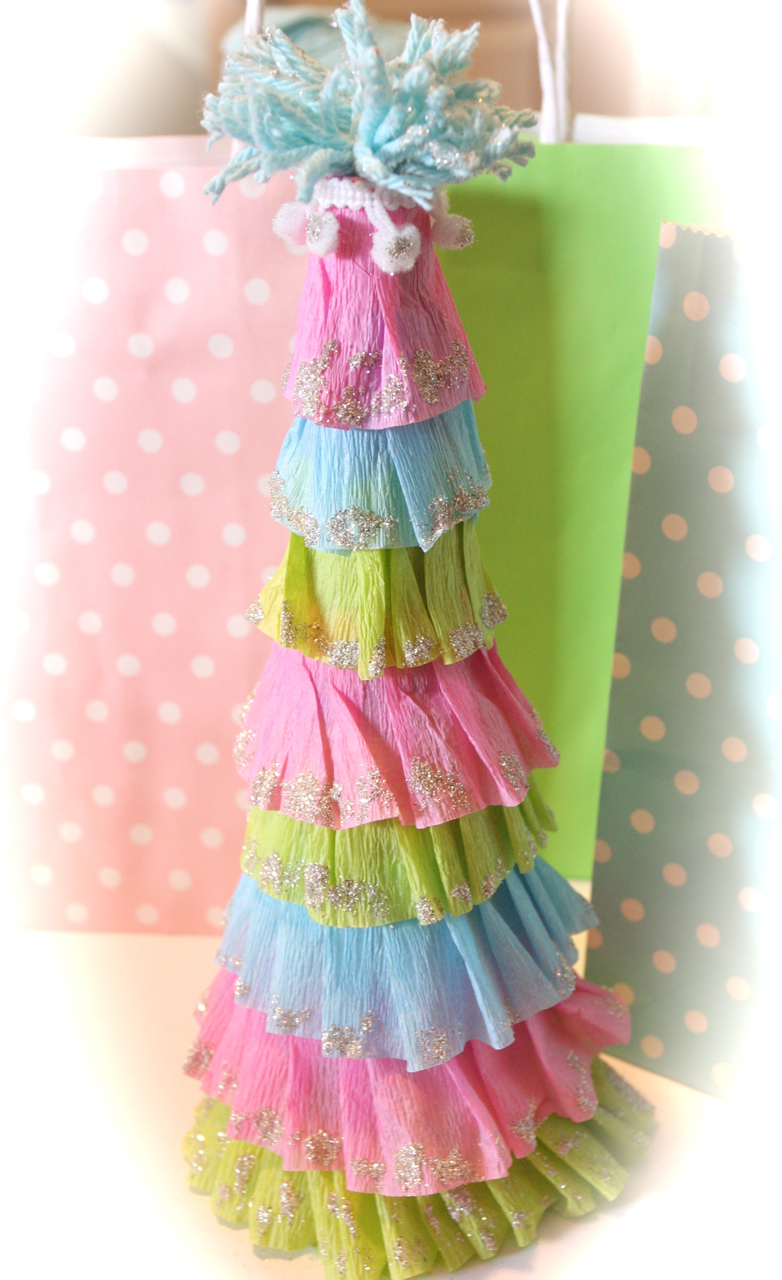
Copyright Karina Guirre at Creative Chaos
Don't know about you all out there - but I NEED these trees! I intend dotting them on every available windowsill.

Copyright Karina Guirre at Creative Chaos
 Here are two very different styles: choose your favourite. I especially like Karina's tutorial on Creative Chaos as you don't even need a special cone (although you do, preferably need a sewing machine for the crepe paper - though I'm pretty sure I've seen it for sale already pre-gathered) as she makes her cones from ordinary A4 paper. Yes, I can see how this could become an obsession....

Coyright Cindy for Joli Paquet
This one's by Cindy for Joli Paquet - no sewing involved, just a glue gun. And a bit of pleating. So easy! No special skills required as long as you keep your fingers out of the glue! A totally different look, more casual and colourful - I bet this would be a total wow on the table at children's parties!

Copyright Karine Guirre at Creative Chaos
Even more with gathered crepe paper - so many ideas, so little time....

Stunning, whichever style you choose!

Friday, December 3, 2010

TWO FABULOUS CHRISTMAS DECORATION TUTORIALS

Here are TWO fabulous tutorials for anyone who likes handmade Christmas decorations.

Copyright Sandy Babb at Quill Cottage blog
The first tutorial is by Sandy at Quill Cottage - so go there for full instructions (very detailed: lots of step by step photos, you can't go wrong!) Sandy has also posted a link to another tutorial (below)  which I've also listed here just in case you miss it...

Copyright Karoline at Cherished Vintage blog
This one is so easy I can't believe it! (although you have to have the kind of brain to think of these things first - which I don't, lol). By Karoline at Cherished Vintage, again there are great step-by-step photographs and it's a fabulous project. I can see this in transparency film, glitter papers....

I just ADORE Christmas, and everything about it! I put up our tree yesterday, so we get full benefit right through to 12th Night (6 January). Sigh....

Friday, November 19, 2010

PINK SATURDAY - BRAG TIME

Poised, ready to rock!
It's been a miserable week due to ill health (more below) so I was totally delighted to get an email yesterday telling me my videos are up!


Collage:
A Guide To Vintage Scrapbooking


Blade Rubber Stamps asked me to do some scrapbooking videos for them, and the first few are now on VideoJug if anyone wants to take a look. Here's just one of them.

Definitely ready, camera turned on....
They're very short sound bites, nothing in-depth, and will probably have you rolling around on the floor, laughing your socks off.


Still waiting...
However, it's my first time in front of a camera so please make allowances. I will put them all on the blog as soon as I get the DVD from the company, without the adverts (sorry about the ads!). Here's the link for the Blade Rubber Blog, which I write (because I can, and because I'm addicted to blogging, lol).

Hope I'm making sense here
A 'baby' layout (Dierdre's baby is now a grown-up teenager and ready to lynch her mother for giving me the photos to use)
Dying for a coffee...
Wow! The coffee's finally arrived... we're also hoping for biscuits...

Here are some of the scrapbook pages demonstrated in the shoot:

MADE TO MEASURE - full view
Closeup of lettering
View showing some of the dimension - and the snap fasteners and safety pins
Closeup of lettering, showing the dimension. I used ink pads to colour the chipboard letters, then covered with Diamond Glaze and threw on some glitter to finish
 The 'baby' page:

Full page view of DINNER TIME featuring Dierdre's daughter Charlie
Closuep of the 3 dangly medallions - I used a circle cutter for these
Another closeup, showing these swing around freely (much fun!)

Another detail view, showing the chipboard lettering - painted white, then Snow glitter on top
And now for another vintage piece:

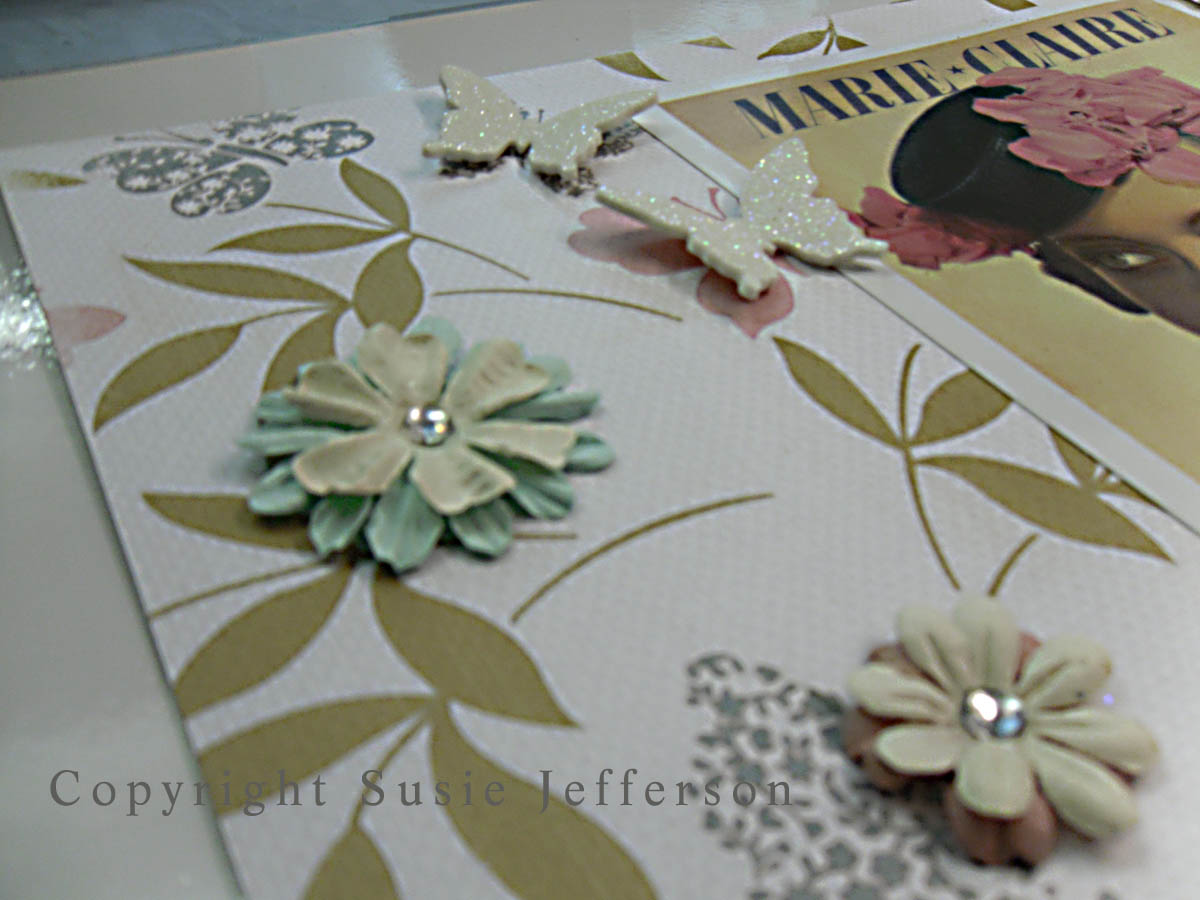
Vintage Chic - the full piece
Two layers of flowers + foam butterflies (glittered) to add dimension

Closeup
Another closeup, showing dimensionof chipboard letters (painted lime green, then glittered)
Finally, just one more piece (I should think you've had enough by now)

GUARDIAN ANGELS - closeup of ribbon, brads, photo corners
Closeup of lettering (stickers! See, you can find some nice ones)
GUARDIAN ANGELS - the full piece

Another closeup, showing the different papers  & layers
I'll load the rest during the week, once I've finished photographing them. I have to say the shoot was pretty nerve-wracking at first but went pretty smoothly. And yes, I'd do it again. Quite an experience!

And now I have to send BIG apologies to everyone who visited me last week - because I didn't visit back. In fact, I didn't visit anyone! So much for the big anniversary dinner: I woke up Saturday morning feeling fine, and by early evening was in bed... for the duration. Flu. Bad, nasty flu - we've both had it and have been housebound the entire week. I finally staggered out the house today to the nearest chemist for more Paracetamol, tissues and cough syrup. Isn't it always the way? The best laid plans etc...

pink saturday

Finally, please visit Beverly at How Sweet the Sound to see all the other wonderful Pink Saturday posts!