Showing posts with label glue. Show all posts

Monday, December 6, 2010

CHRISTMAS SHELF EDGING & COFFEE FILTER WREATH TUTORIALS

Kitchen lights - bet Peter won't be happy about the nail holes in the shelf edge!
Closeup - note I actually strung all the little baubles. Talk about fiddly!
Sometimes I just can't leave well enough alone, so decided to put some Christmas lights in the kitchen this year.

I'm actually yearning for lit-up chilli peppers or something food related, but not being willing to spend around £30 ($50) for one string of only 10 lights, these had to do instead. Plus a few extra danglies I happened to have spare - they just wouldn't fit on the tree!

PUNCHED SHELF EDGING

Copyright Susie Jefferson for Blade Rubber Stamps

This pic shows a shelf liner edging I did as part of a tutorial I wrote for Blade Rubber Stamps - just scrapbooking paper cut into strips, then joined up into one long length - and two punches. Easy peasy - and quick! So you might like to have a go at that one. Full instructions are here.

Seeing the pix again, I wish I'd done this first, then added the lights. Too late now!

COFFEE FILTER WREATH

Copyright HappyDotMom
Just found this! Isn't it fabulous? It's a polystyrene base and a ton of COFFEE FILTERS! Love it, love it, love it!

Go here to see the full tutorial by Lilly at HappyDotMom.

I think I'd have to meddle though... surely there's room somewhere for a set of lights as well? Even if it's just teeny little LED ones? Or maybe just a teensy spot of glitter.... (sorry, sometimes I just can't help myself...)

Sunday, May 2, 2010

ALTERED TOTE PROJECT - 3 DIFFERENT BAGS BY 3 DIFFERENT ARTISTS

Stampington has done a great altered tote bag project - three different artists, same bag.

Copyright Roben-Marie Smith for Stampington


The big secret is walnut ink. I have some of that! (Been unused at the back of a drawer for around 3 years, so I'm finally going to get some use out of it, hooray!). I also like her little touches of velvet leaves etc.


Here are the other two projects, each very different, featuring the same basic canvas bag. Aren't they brilliant!

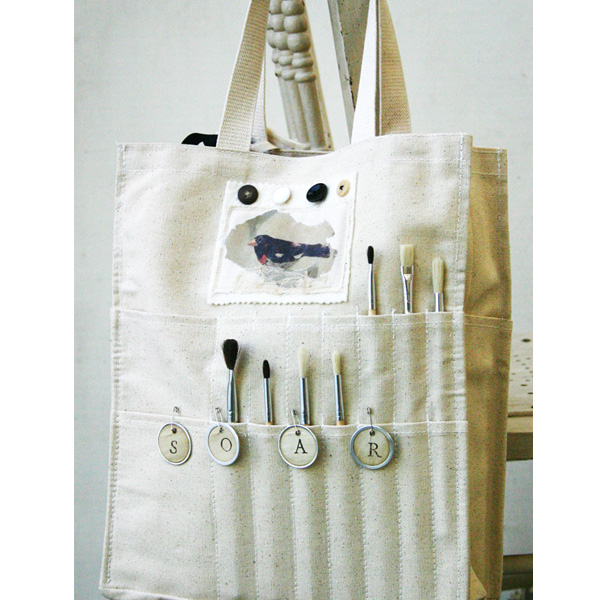
SOAR 
by Becky Shander

Copyright Becky Shander for Stampington

DIRECTIONS

Begin by transferring images of birds onto canvas fabric. To create image transfers make a color copy of the images you’d like to transfer. (I use the copy machines at Staples to make my copies.) Before printing each copy, select the reverse copy option and adjust the image size accordingly.) Cut around the photocopy image and use a sponge brush to spread gel medium (Golden, regular matte formula) onto the image. Then flip the image over and press it onto the canvas. Use a brayer over the back of this image to make sure that there’s enough contact between the photocopy image and canvas. Then allow the gel medium to dry. Once the gel medium is dry, peel off the paper. Your image should be transferred. If the paper is difficult to remove, apply a water-dampened sponge over the image and let it sit for a few minutes. Then use your finger tips to gently rub off the excess paper. Allow the canvas with the transferred image to dry.

To create my black, white and red bird patch use scissors to trim around the bird images into a rectangle. Cut a small piece of lace scrap to fit along the bottom of the bird and sew to attach. Cut a piece of organic cotton batting slightly larger than the canvas with the bird image. Then place the canvas rectangle with the bird image on top of the batting and arrange color coordinated buttons across the top. When you’re happy with the button placements, temporarily remove them and sew the canvas with the bird image onto the batting. Then hand stitch the buttons to the batting. Use an embroidery needle with thread to add a French knot detail to the bird’s eye. Use pinking shears to trim around the top and bottom edges of the batting. Apply craft glue to the back of this batting patch and adhere it to the tote. 

Use Staz-On ink to stamp letters (ex. s, o, a, r) onto tea-dyed office supply tags. Attach the tags to the tote using mini-safety pins.

For the “search” patch, cut a piece of canvas into an elongated rectangle shape. Then cut a piece of organic cotton batting and a piece of vintage striped fabric to fit under the canvas. Use letter stamps and Staz-On ink to stamp a word (ex. s, e, a, r, c, h), then use pinking shears to trim around the edges. Sew this canvas along the edges and on top of the batting (be sure to leave space at the top of the batting for a row of buttons.) Hand stitch the buttons on to the batting. To finish this patch, sew the batting to the striped fabric along the edges. Apply craft glue to the back of this batting patch and adhere it to the tote. 

For the mini-batting patch (for the tote handle), trim around the transferred bird image. Then cut organic cotton batting, canvas and tea-dyed used dryer sheet into rectangle shapes. Place the bird image on top of the canvas and dryer sheet and sew it around the edges to attach. Next, cut a piece of fabric tape measure to fit across the canvas and dryer sheet, and embroider stitch an “x.” Place the tape measure on top of the canvas and tea-dyed used dryer sheet (under the bird image, and leave some space for a lace scrap nest) and sew it around the edges to attach. Attach the canvas fabric to the top of the batting base by sewing along the outside edges. For the nest, cut tiny pieces of antique lace and adhere them to the bottom of the bird using craft glue. Lastly, use a safety pin to attach this patch along with color-coordinated ribbons to the tote handle. As a bonus, this mini-bird patch can be used as a bookmark.

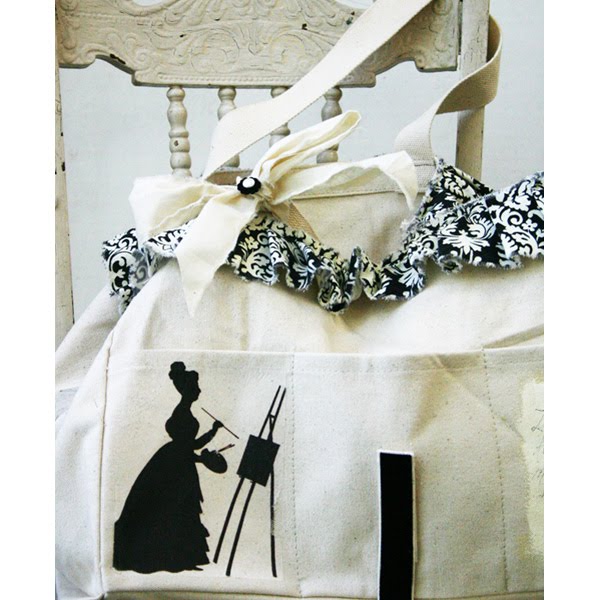
A Delightful Bag of Creativity 
by Kristen Robinson

Copyright Kristen Robinson for Stampington

DIRECTIONS
 
1. Begin by printing the silhouette onto either muslin or iron paper and set aside to dry per manufacturer’s instructions.

2. Using your sewing machine or hand stitching, attach printed fabric to the top of the bag; gathering as you feed the fabric through the machine. Using a straight stitch as well as a heavy thread will insure the fabric will remain in place nicely.

3. Cut or tear out a piece of your printed fabric measuring roughly 5x5. To the top of this add a piece of muslin that has the word delight printed on to it or stamped on to it. Embellish with a strip of trim. Sew this to the center of the bag on the back side.

4. To the sides of the bag stamp an image or scroll using StazOn Ink.

5. Iron on or sew on the silhouette image to the pocket. 

6. To the top of the Velcro (which holds the bottom closed) either sew or glue with a piece of velvet ribbon over the top of it. 

7. Onto the left hand pocket of the bag add a layer of white and crème acrylic paint that has been mixed together. It is a good idea to place a piece of cardboard or heavy cardstock within the pocket as this will protect the inside fabric.

8. Using a piece of torn muslin created a bow that will be placed on one of the bags handles. Add a favorite button to the top.

9. Finally add a bit of journaling to the painted area you created. 

For full details of all products used, check out Stampington's website.

Aren't these seriously fabulous! And not that hard...

Thursday, May 28, 2009

NAKED FLAME - CANDLE ART

This is another old article of mine, which I thought might give you a few ideas.


Originally published in Issue 2, Simply Stamping 2006


So I have scanned at large resolution to enable you to actually READ the technique when you click on the thumbnails.


It's basically stamping onto giftwrap tissue. The way I apply the tissue to the candle actually bonds it, so it is safe to burn.


Naked Flame article
Copyright Susie Jefferson


Have fun with it!

Wednesday, March 25, 2009

HOW TO STRETCH PAPER


I think stretching paper is one of those "need to know" things - but nobody talks about how to do it! So here you are.

Cirque 1 skinny book page by Susie Jefferson


SO, why would you want to stretch your paper?

Whenever you want to work with wet mediums (watercolour, acrylics, collage - anything involving paint, glue etc) and you don't want the paper to buckle. Very useful for ATCs, skinny books, fat books, deco books, as well: you can do a whole series, then cut them off the board when you have finished.

You can also leave stretched paper on the board for months (I left one board I forgot about for around 2 years) with no detriment! Stretched paper gives a great professional finish to any artwork - watercolours especially are spoilt if the paper has buckled.

I learnt this method when I was at art college, back in The Day, and having seen other methods (soaking with sponges etc) I think this is still by far the easiest way.

This is an A1 (parent-sized) sheet of heavyweight watercolour paper, by the way.


Dunk a sheet of paper in a bath or sink (depends on the size of the sheet of paper) with around an inch of water in it.

To do this, take the paper at the corners with your thumbs and forfingers (short edge) and dip into the water at one side, guiding the paper along the curve at the bottom of the bath and up and out at the other side.

Take the paper out straight away, shake the excess water off and then lay the paper straight onto your board (plywood, MDF etc). Smooth out roughly with your hand so it lays flat(ish) but not too much: let it lay how it likes.


Use gummed brown paper tape, dip into the water, then place over the wet paper, long sides first then short sides. Don't worry about wrinkles in the centre of the paper as long as the edges are smooth. It'll sort itself out when it dries.


Place half the gummed tape on the paper and half on the board, making sure you overlap the edges.
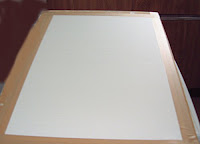


LEAVE IT ALONE until completely dry. You can stand it up on end to allow the water to drip off, if you prefer. When dry, you will see a beautiful expanse of absolutely flat paper!


Do all your work whilst the paper is still on the board. This means all paint, paper, glue etc. Allow to dry thoroughly. You can see here that I drew my guide lines on the board, leaving small margins for excess collage work. This was a series of 16 skinny pages, each 3 inches x 6 inches, all of them different.

When it's all dry, and your work completely finished - THEN you cut it off the board (use a metal ruler and craft knife). If you need to do more wet work, leave it on the board or you may still get buckling.


Cirque 2 skinny book page by Susie Jefferson


The poodle was from a packet of tissues (I tore off the top layer). Who could resist a poodle so PINK?


Cirque 3 skinny book page by Susie Jefferson


All these pages were perfectly flat, and bound beautifully!

Monday, September 8, 2008

MORE LINKS, ART-E-ZINE, FABRIC PAPER

I've put up some more Links categories - scroll down till you see something you like. I had a very happy afternoon blog-hopping, finding new artwork to drool over.

Has anyone seen Art-e-zine lately?
http://www.art-e-zine.co.uk/newstuff.html

Gillian Allen has run this fabulous site over several years and it just keeps getting better! If you don't know this site (I already put it in my Resources links) then make yourself the hot beverage of your choice, a few biscuits or whatever for sustenance and prepare to cosy up to some of the most fabulous artwork on the net for the next hour or three. I just found this little link of Gillian's personal Final Solution for what to do with all those bits & pieces of paper we just can't throw away:
http://www.art-e-zine.co.uk/box.html
Start now in time for Christmas is all I'll say. Perfect for putting little gifties in (earrings, brooches, miniature books).

Spread it out into a sheet and you have another version of Fabric Paper! If you pile it all too high and you are worried about bits coming adrift, what about adding yet another layer: NET (I'm thinking net as in ballet tutus). Or wide organza ribbon. Sew it down - use a machine (a simple zigzag stitch would be safest - the thread will be less likely to break and the needle to snag). Try a ballpoint needle - or a leather needle if the paper is very thick.

OR... forget the machine. Hand sew it! Use embroidery floss - at least 3 strands, or the full thickness, and try these stitches: cross stitch, herringbone stitch, running stitch, blanket stitch (same as buttonhole but more widely spaced) & chain stitch. Here's how to do them:
http://vintagesewing.info/19th/1892-sn/sn-03.html
Throw in a couple of French Knots (also in the link). You'll get great texture and a brilliant substrate for whatever else you might want to throw on top.

Gluing? I recommend PVA glue (white glue) and I really like ArtAttack
http://www.laoffice.co.uk/search/show_product.aspx?Pid=623953
which is sold in most stationers in the UK. It's very fluid, has great slip, dries clear and is washable so you can get it out of clothes and brushes (I often forget and the brush has dried solid overnight - if this happens to you, leave the brush to soak in COLD water,then wash out under the tap, working a little dishwashing liquid into the bristles. It will dry good as new.) Berol dries rock solid on brushes (as does Mod Podge) and you have to throw them away... unless you keep them for making designs in paste papers.