William Holden and Gloria Swanson in Sunset Boulevard
Not precisely a Halloween post, but already getting in the mood... Film Noir. A fabulous genre, circa 1940s-50s - and modern film makers just haven't got it right.
The opening sequence in the video below is Fred McMurray in Double Indemnity (have you seen that pale imitation of a remake?) These films were made by caring directors, a cast acting its socks off - and plots To Die For (often literally). Nowadays, special effects seem to have taken over from the story, which is why so many are such a disappointment. Go and rent these oldies, and wallow in some of the best films ever made.
The Endless Night - a Valentine to Film Noir (by RubyTuesday717)
How many stars can you recognise? I'm ashamed to say I can't name all of them. Players include (the ones I can name, anyway):
Fred MacMurray Joseph Cotton Orson Welles Edward G Robinson Bette Davis Carole Lombard Burt Lancaster Richard Widmark Ingrid Bergman Cary Grant Robert Mitchum Jean Simmons Rita Hayworth Barbara Stanwyck Humphrey Bogart Googie Withers Gloria Swanson Michael Rennie Lillian Gish Ann Savage Glenn Ford Ava Gardner Gene Tierney Peter Lorre
They had style, they had class - and the black&white photography only added to the effect. The lighting was superb, the atmosphere second to none...
If I've now got you interested in Film Noir, do rent out some of these films (my all-time favourites):
Double Indemnity (Fred MacMurray, Barbara Stanwyck, Edward G Robinson)
All About Eve (Bette Davis, Anne Baxter, George Sanders)
Casablanca (Humphrey Bogart, Ingrid Bergman)
Night of the Hunter (Robert Mitchum, Lillian Gish)
The Maltese Falcon (Humphrey Bogart, Peter Lorre, Sidney Greenstreet)
The Third Man (Michael Rennie, Orson Welles)
Whatever Happened to Baby Jane (Bette Davis, Joan Crawford)
The screensaver I've designed - icons wherever you want them to go (copyright Susie Jefferson)
This week, I decided to get my desktop organised.
I've been reading a book from the library on how to care for your computer, cosset it, generally keep it happy - and discovered to my horror that my beloved Active Desktop Screensaver (which I've had for years) is Not A Good Idea!
My old desktop screensaver - Active Desktop Calendar to the right, and all my icons on the left in orderly rows
These use up loads of memory, and if your computer is temperamental and on the old side (yes, to both) then you really shouldn't have anything active on your desktop. No fancy stuff apart from icons. Well, I don't know about you - but I find the screensavers that come with my computer programme (Windows XP) are beyond boring!
Screensaver at 1680 x 1050 resolution Click here for the direct download
Screensaver at 1800 x 1050 resolution Click here for the direct download
So I decided to make my own desktop calendar page for August, and here it is if you'd like to download it too. Left-click to open the folder at full size then right-click to save to your computer OR use the direct download links under the pictures.
TUTORIAL
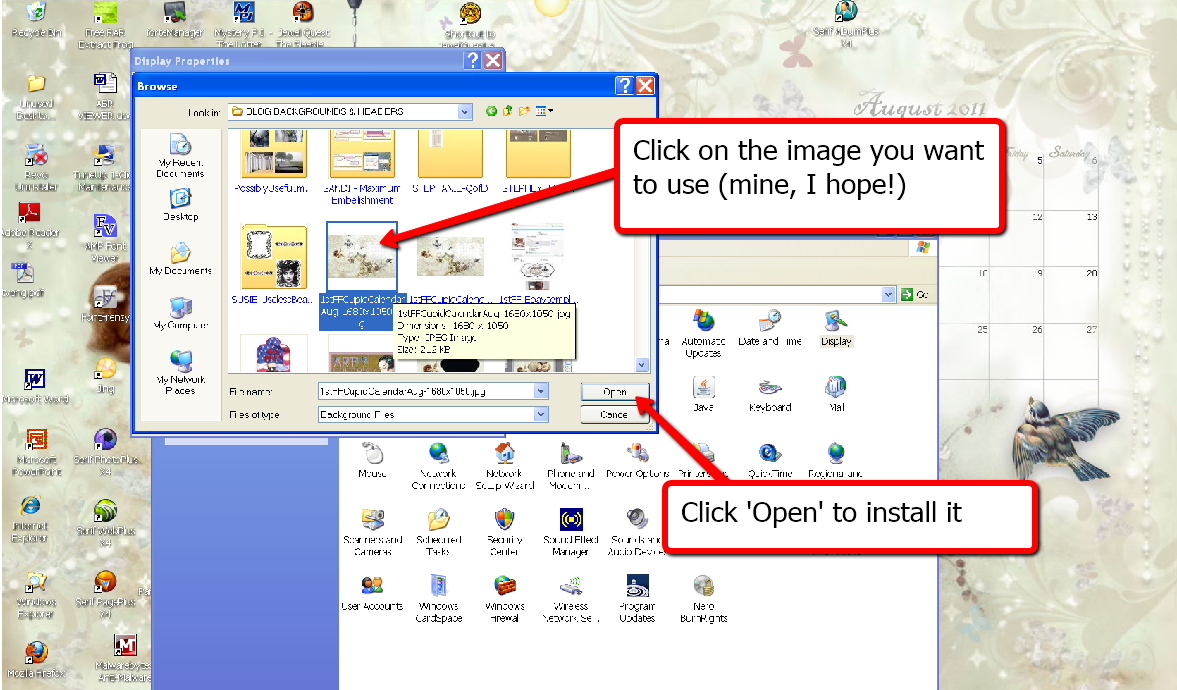
Here's how to install your own screensaver - and also put your icons where you want them!
NOW ARRANGE YOUR DESKTOP ICONS WHERE YOU WANT THEM:
It's even easier than it looks! And if you want all your icons ordered into a grid or auto arranged - just tick the boxes again.Hope you like the screensaver and find it and the tutorial useful.
To enter your own notes and dates the easy way, either use your favourite graphics programme - or go to my Computery page and have a look at all the free programmes out there. Some you don't even need to download! And here's how to add a text layer:
Finally, please visit Beverly at How Sweet the Sound to see all the other wonderful Pink Saturday posts!
Just before Christmas, I was over at my friend Jamie's house, having a play day, and Jamie photographed my process using wooden print blocks. So here are the videos!
If you want to see the how-to for the pink box, here's the tutorial I did earlier.
This one is a tutorial for a simple 3-hole pamphlet bound book. You'll see I also created all the pages, so the book is complete - all it needs is a bit of journalling. As I used acrylics (which dry waterproof) the pages are safe to collage, paint, glue, distress...
When doing the stitching, start at the centre hole (from the inside or outside of the book, your choice) then go up to the next hole. Bring the thread down to the last hole (missing out the centre hole) and then finish off by stitching through that centre hole again. Postion the thread so one end is one either side of the length of thread you just stitched, and tie off by trapping that central thread between the two ends. Use a square or Reef knot (right over left, left over right) and trim close to the knot. Press down on the knot with a bone folder to flatten. That's it!
Here, I was using acrylics and gesso - just make sure you clean your blocks or stamps continuously, because once this stuff dries, it's permanent. (I plonk mine image-side down on a damp flannel, sponge, wad of kitchen paper, to keep the surface moist till I'm ready to clean up.)
I've done a frame image for you this week - this could be used as a picture or even a blog header (just add your own text and click to resize). It would also work as a Valentine image, which was my original idea, but I couldn't find an image I liked.
Left click to bring up to full size, and right-click to save to your computer. Add your photograph in a layer below this then merge. This is a png, so the central white portion is actually transparent. If this doesn't download correctly, use this image code instead:
Here's a great little tutorial I just found for you - a fast & easy, minimum-sew cushion cover, plus how to make your own stencils out of freezer paper!
Here's the link for the downloadable pdf with full instructions!
Great for last-minute room decoration before The Holidays and also for gifts - and very welcome, considering what cushion covers are costing these days. If you don't like sewing, you could minimise it by using a longer piece of fabric to wrap right around and overlap, saving two extra seams... plus you can easily work out any size and shape to suit your cushion pads!
This project also uses Tim Holtz's acrylic Paint Dabbers - what could be easier? (or use acrylic paint straight out the bottle or tube, squeezed onto a paper plate, and a stencil brush).
TIP: For those of you in the UK, you'll find freezer paper in the more upmarket supermarkets, a lot of craft stores or online.
SHORT RANT ON THE SUBJECT OF FOAM/FIBRE CUSHION PADS I loathe those foam or fibre-filled pads with a deathly loathing - lumpy, and they go flat in seconds. Doesn't matter what you do, they won't fluff up nicely like feather pads do - so why do the shops insist on selling filled cushions? I just want the covers! Yes, use a pad for display but sell them flat - not only easier to carry home, but should knock at least £5 off the price. And I'll be binning them anyway (even the charity shops in my area don't want them).
Buy feather pads - now anti-allergy treated - which is greener and much more economical in the long run, and also give a much nicer effect. Plus you can really snuggle up in them!
They're very short sound bites, nothing in-depth, and will probably have you rolling around on the floor, laughing your socks off.
Still waiting...
However, it's my first time in front of a camera so please make allowances. I will put them all on the blog as soon as I get the DVD from the company, without the adverts (sorry about the ads!). Here's the link for the Blade Rubber Blog, which I write (because I can, and because I'm addicted to blogging, lol).
Hope I'm making sense here
A 'baby' layout (Dierdre's baby is now a grown-up teenager and ready to lynch her mother for giving me the photos to use)
Dying for a coffee...
Wow! The coffee's finally arrived... we're also hoping for biscuits...
Here are some of the scrapbook pages demonstrated in the shoot:
MADE TO MEASURE - full view
Closeup of lettering
View showing some of the dimension - and the snap fasteners and safety pins
Closeup of lettering, showing the dimension. I used ink pads to colour the chipboard letters, then covered with Diamond Glaze and threw on some glitter to finish
The 'baby' page:
Full page view of DINNER TIME featuring Dierdre's daughter Charlie
Closuep of the 3 dangly medallions - I used a circle cutter for these
Another closeup, showing these swing around freely (much fun!)
Another detail view, showing the chipboard lettering - painted white, then Snow glitter on top
And now for another vintage piece:
Vintage Chic - the full piece
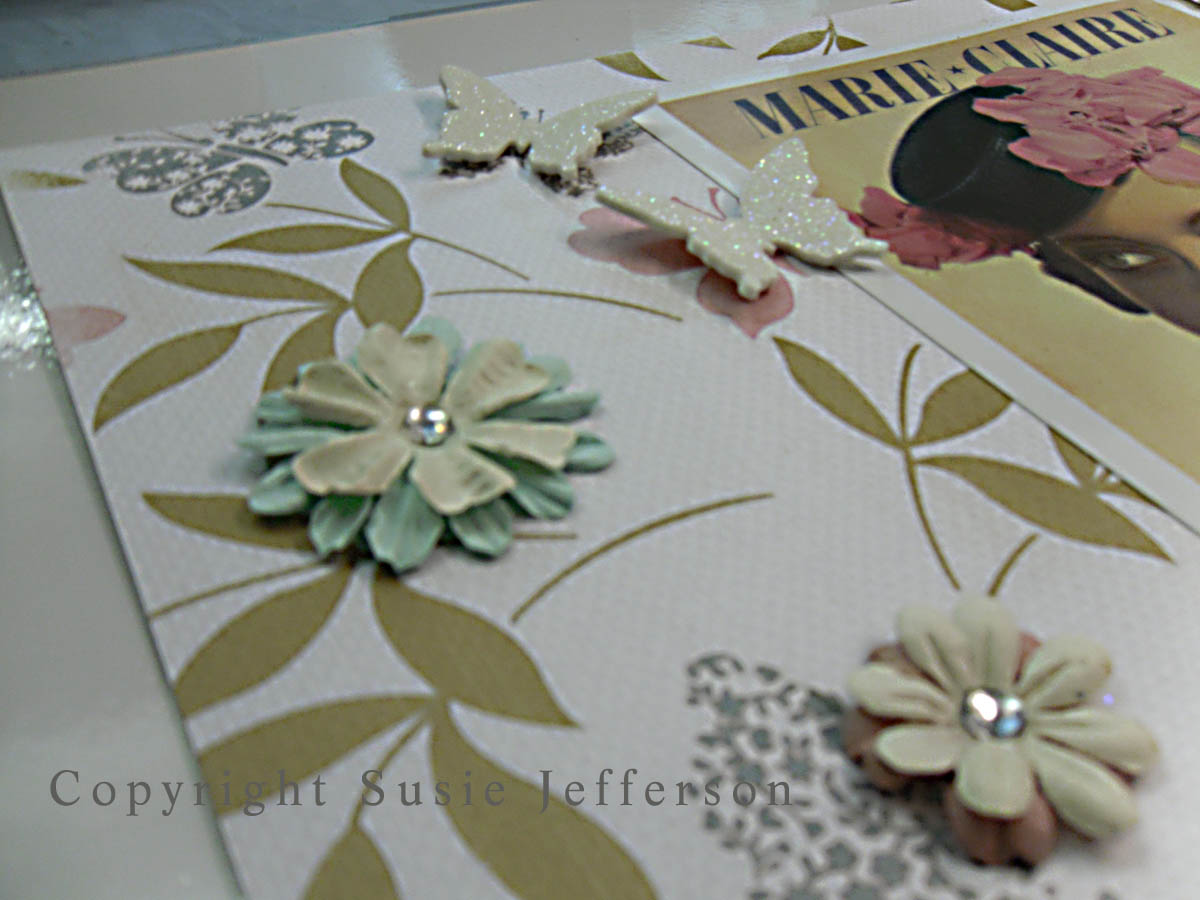
Two layers of flowers + foam butterflies (glittered) to add dimension
Closeup
Another closeup, showing dimensionof chipboard letters (painted lime green, then glittered)
Finally, just one more piece (I should think you've had enough by now)
GUARDIAN ANGELS - closeup of ribbon, brads, photo corners
Closeup of lettering (stickers! See, you can find some nice ones)
GUARDIAN ANGELS - the full piece
Another closeup, showing the different papers & layers
I'll load the rest during the week, once I've finished photographing them. I have to say the shoot was pretty nerve-wracking at first but went pretty smoothly. And yes, I'd do it again. Quite an experience!
And now I have to send BIG apologies to everyone who visited me last week - because I didn't visit back. In fact, I didn't visit anyone! So much for the big anniversary dinner: I woke up Saturday morning feeling fine, and by early evening was in bed... for the duration. Flu. Bad, nasty flu - we've both had it and have been housebound the entire week. I finally staggered out the house today to the nearest chemist for more Paracetamol, tissues and cough syrup. Isn't it always the way? The best laid plans etc...
Finally, please visit Beverly at How Sweet the Sound to see all the other wonderful Pink Saturday posts!
Roben-Marie has put the freebie mask and frame links right underneath the videos on her tutorial page.
As you all know, I do a fair amount of digital stuff (the blog backgrounds etc) but with Photoshop, there's always another way of doing things: tips, tricks etc - so I'm putting these tutorials right here so I don't lose them. For a starter (being self-taught) I never knew about that 'hold down the shift key' tip!
The big secret is walnut ink. I have some of that! (Been unused at the back of a drawer for around 3 years, so I'm finally going to get some use out of it, hooray!). I also like her little touches of velvet leaves etc.
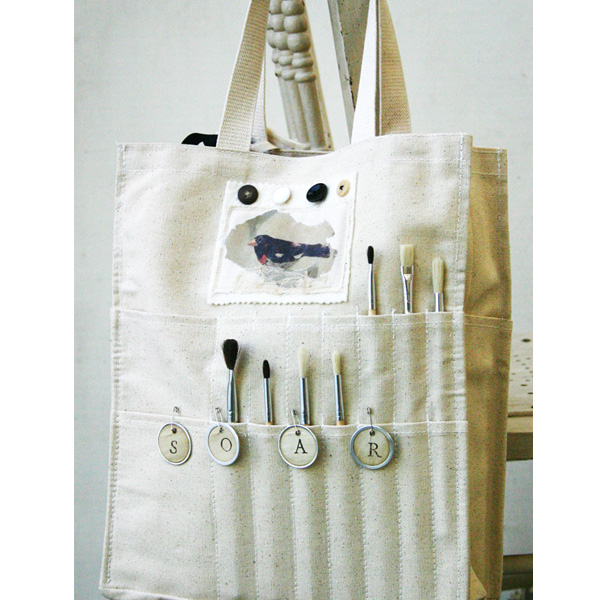
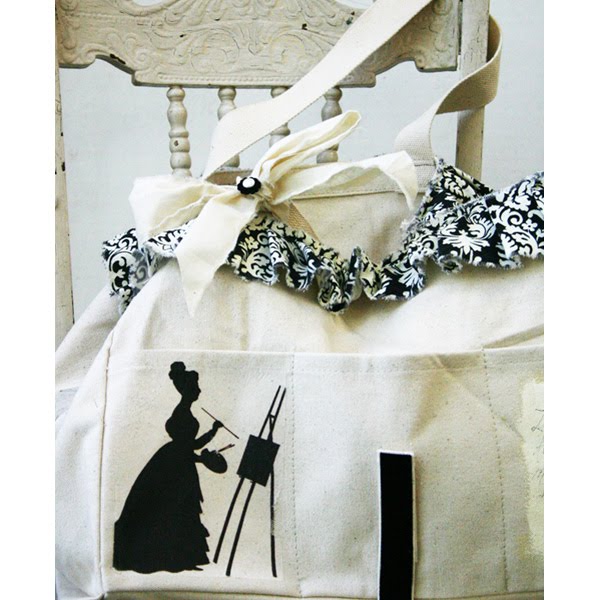
Here are the other two projects, each very different, featuring the same basic canvas bag. Aren't they brilliant!
Begin by transferring images of birds onto canvas fabric. To create image transfers make a color copy of the images you’d like to transfer. (I use the copy machines at Staples to make my copies.) Before printing each copy, select the reverse copy option and adjust the image size accordingly.) Cut around the photocopy image and use a sponge brush to spread gel medium (Golden, regular matte formula) onto the image. Then flip the image over and press it onto the canvas. Use a brayer over the back of this image to make sure that there’s enough contact between the photocopy image and canvas. Then allow the gel medium to dry. Once the gel medium is dry, peel off the paper. Your image should be transferred. If the paper is difficult to remove, apply a water-dampened sponge over the image and let it sit for a few minutes. Then use your finger tips to gently rub off the excess paper. Allow the canvas with the transferred image to dry.
To create my black, white and red bird patch use scissors to trim around the bird images into a rectangle. Cut a small piece of lace scrap to fit along the bottom of the bird and sew to attach. Cut a piece of organic cotton batting slightly larger than the canvas with the bird image. Then place the canvas rectangle with the bird image on top of the batting and arrange color coordinated buttons across the top. When you’re happy with the button placements, temporarily remove them and sew the canvas with the bird image onto the batting. Then hand stitch the buttons to the batting. Use an embroidery needle with thread to add a French knot detail to the bird’s eye. Use pinking shears to trim around the top and bottom edges of the batting. Apply craft glue to the back of this batting patch and adhere it to the tote.
Use Staz-On ink to stamp letters (ex. s, o, a, r) onto tea-dyed office supply tags. Attach the tags to the tote using mini-safety pins.
For the “search” patch, cut a piece of canvas into an elongated rectangle shape. Then cut a piece of organic cotton batting and a piece of vintage striped fabric to fit under the canvas. Use letter stamps and Staz-On ink to stamp a word (ex. s, e, a, r, c, h), then use pinking shears to trim around the edges. Sew this canvas along the edges and on top of the batting (be sure to leave space at the top of the batting for a row of buttons.) Hand stitch the buttons on to the batting. To finish this patch, sew the batting to the striped fabric along the edges. Apply craft glue to the back of this batting patch and adhere it to the tote.
For the mini-batting patch (for the tote handle), trim around the transferred bird image. Then cut organic cotton batting, canvas and tea-dyed used dryer sheet into rectangle shapes. Place the bird image on top of the canvas and dryer sheet and sew it around the edges to attach. Next, cut a piece of fabric tape measure to fit across the canvas and dryer sheet, and embroider stitch an “x.” Place the tape measure on top of the canvas and tea-dyed used dryer sheet (under the bird image, and leave some space for a lace scrap nest) and sew it around the edges to attach. Attach the canvas fabric to the top of the batting base by sewing along the outside edges. For the nest, cut tiny pieces of antique lace and adhere them to the bottom of the bird using craft glue. Lastly, use a safety pin to attach this patch along with color-coordinated ribbons to the tote handle. As a bonus, this mini-bird patch can be used as a bookmark.
1. Begin by printing the silhouette onto either muslin or iron paper and set aside to dry per manufacturer’s instructions.
2. Using your sewing machine or hand stitching, attach printed fabric to the top of the bag; gathering as you feed the fabric through the machine. Using a straight stitch as well as a heavy thread will insure the fabric will remain in place nicely.
3. Cut or tear out a piece of your printed fabric measuring roughly 5x5. To the top of this add a piece of muslin that has the word delight printed on to it or stamped on to it. Embellish with a strip of trim. Sew this to the center of the bag on the back side.
4. To the sides of the bag stamp an image or scroll using StazOn Ink.
5. Iron on or sew on the silhouette image to the pocket.
6. To the top of the Velcro (which holds the bottom closed) either sew or glue with a piece of velvet ribbon over the top of it.
7. Onto the left hand pocket of the bag add a layer of white and crème acrylic paint that has been mixed together. It is a good idea to place a piece of cardboard or heavy cardstock within the pocket as this will protect the inside fabric.
8. Using a piece of torn muslin created a bow that will be placed on one of the bags handles. Add a favorite button to the top.
9. Finally add a bit of journaling to the painted area you created.