I saw this on Spunky Junky blog - and like all good ideas, the simplest is the best!This was definitely a 'Duh!' moment, as in 'Why didn't I think of that myself?'
I'm really excited to announce I know a Published Author (brag, brag, brag).
Wendy Cotterill of Gallery Textiles who is a fantastic fibre artist - has finally got published (and high time too) and it's on pre-order at Amazon!
Wendy Cotterill
Amazon is publishing the book under its American title (see pic above) but Scribd is publishing under the UK title (go figure...) and here is the Scribd link, which also shows a sampler of the contents! This I like a lot. Great idea.
For those of you who don't know her: she's a British artist, has been published in Cloth, Paper, Scissors; Craft Stamper (UK) and Simply Stamping (UK) etc.
Here are two examples of her wonderful paper quilts.
Gold Stars
Red Hearts
I'm hoping this book is going to be a big hit - I went with her when she first spoke to her publishers (we incorporated a shopping trip as well, lol) and knowing Wendy, I know what a tremendous amount of work and original ideas have gone into it.
Wendy also manufactures some rather wonderful mica sprays and pigments - I'm in awe! Don't you just love to see nice things happen for nice people?
UPDATE: Just to clarify for anyone wanting to buy the book:
UK edition
Spunbonded Textile & Stitch
Lutradur, Evolon & other distressables Wendy Cotterill
Batsford Books ISBN 978-1849940016 April 2011
US edition
Lutradur and the New Fibers; Creating Mixed Media Art with the New Spunbonded Materials
ISBN 978-1596683341 Interweave Press April 2011
Either title can be found on amazon US or UK but the Batsford edition is in hardback. The Scrib link shows the US edition - which may or may not be the final proof - Wendy hasn't had a printout yet.
COLOURICIOUS is a fabulous UK-based company run by Jamie Malden - an absolute powerhouse of ideas! Her latest projects are art DVDs, made and produced by herself, featuring mainly British artists.
Here's a taster of her latest, on recycling - with some wonderful ideas for cushions and a woven bag (pretty much completed in the clip) so watch the DVD, turn up the sound, grab a coffee and ENJOY.....
I for one am going to have a go at that woven bag!
The big secret is walnut ink. I have some of that! (Been unused at the back of a drawer for around 3 years, so I'm finally going to get some use out of it, hooray!). I also like her little touches of velvet leaves etc.
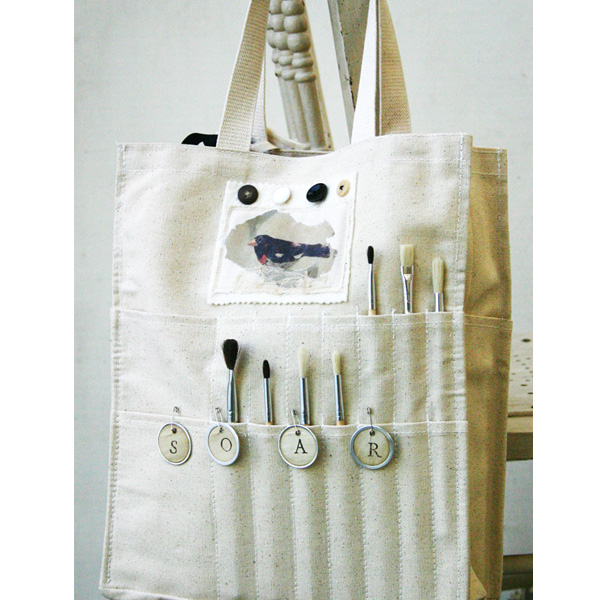
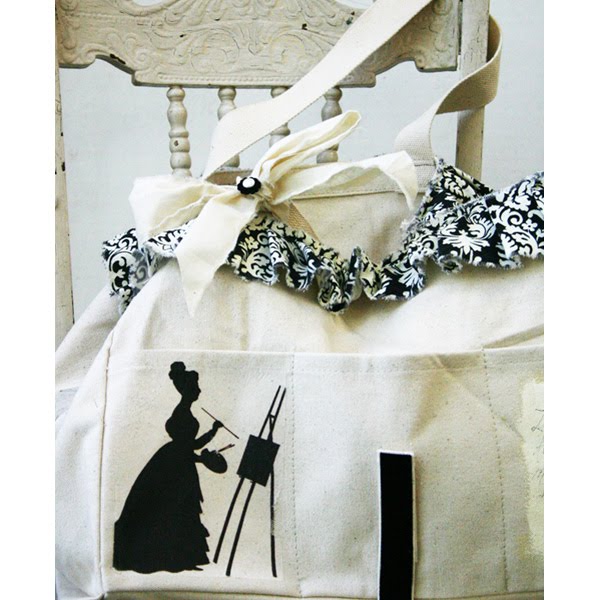
Here are the other two projects, each very different, featuring the same basic canvas bag. Aren't they brilliant!
Begin by transferring images of birds onto canvas fabric. To create image transfers make a color copy of the images you’d like to transfer. (I use the copy machines at Staples to make my copies.) Before printing each copy, select the reverse copy option and adjust the image size accordingly.) Cut around the photocopy image and use a sponge brush to spread gel medium (Golden, regular matte formula) onto the image. Then flip the image over and press it onto the canvas. Use a brayer over the back of this image to make sure that there’s enough contact between the photocopy image and canvas. Then allow the gel medium to dry. Once the gel medium is dry, peel off the paper. Your image should be transferred. If the paper is difficult to remove, apply a water-dampened sponge over the image and let it sit for a few minutes. Then use your finger tips to gently rub off the excess paper. Allow the canvas with the transferred image to dry.
To create my black, white and red bird patch use scissors to trim around the bird images into a rectangle. Cut a small piece of lace scrap to fit along the bottom of the bird and sew to attach. Cut a piece of organic cotton batting slightly larger than the canvas with the bird image. Then place the canvas rectangle with the bird image on top of the batting and arrange color coordinated buttons across the top. When you’re happy with the button placements, temporarily remove them and sew the canvas with the bird image onto the batting. Then hand stitch the buttons to the batting. Use an embroidery needle with thread to add a French knot detail to the bird’s eye. Use pinking shears to trim around the top and bottom edges of the batting. Apply craft glue to the back of this batting patch and adhere it to the tote.
Use Staz-On ink to stamp letters (ex. s, o, a, r) onto tea-dyed office supply tags. Attach the tags to the tote using mini-safety pins.
For the “search” patch, cut a piece of canvas into an elongated rectangle shape. Then cut a piece of organic cotton batting and a piece of vintage striped fabric to fit under the canvas. Use letter stamps and Staz-On ink to stamp a word (ex. s, e, a, r, c, h), then use pinking shears to trim around the edges. Sew this canvas along the edges and on top of the batting (be sure to leave space at the top of the batting for a row of buttons.) Hand stitch the buttons on to the batting. To finish this patch, sew the batting to the striped fabric along the edges. Apply craft glue to the back of this batting patch and adhere it to the tote.
For the mini-batting patch (for the tote handle), trim around the transferred bird image. Then cut organic cotton batting, canvas and tea-dyed used dryer sheet into rectangle shapes. Place the bird image on top of the canvas and dryer sheet and sew it around the edges to attach. Next, cut a piece of fabric tape measure to fit across the canvas and dryer sheet, and embroider stitch an “x.” Place the tape measure on top of the canvas and tea-dyed used dryer sheet (under the bird image, and leave some space for a lace scrap nest) and sew it around the edges to attach. Attach the canvas fabric to the top of the batting base by sewing along the outside edges. For the nest, cut tiny pieces of antique lace and adhere them to the bottom of the bird using craft glue. Lastly, use a safety pin to attach this patch along with color-coordinated ribbons to the tote handle. As a bonus, this mini-bird patch can be used as a bookmark.
1. Begin by printing the silhouette onto either muslin or iron paper and set aside to dry per manufacturer’s instructions.
2. Using your sewing machine or hand stitching, attach printed fabric to the top of the bag; gathering as you feed the fabric through the machine. Using a straight stitch as well as a heavy thread will insure the fabric will remain in place nicely.
3. Cut or tear out a piece of your printed fabric measuring roughly 5x5. To the top of this add a piece of muslin that has the word delight printed on to it or stamped on to it. Embellish with a strip of trim. Sew this to the center of the bag on the back side.
4. To the sides of the bag stamp an image or scroll using StazOn Ink.
5. Iron on or sew on the silhouette image to the pocket.
6. To the top of the Velcro (which holds the bottom closed) either sew or glue with a piece of velvet ribbon over the top of it.
7. Onto the left hand pocket of the bag add a layer of white and crème acrylic paint that has been mixed together. It is a good idea to place a piece of cardboard or heavy cardstock within the pocket as this will protect the inside fabric.
8. Using a piece of torn muslin created a bow that will be placed on one of the bags handles. Add a favorite button to the top.
9. Finally add a bit of journaling to the painted area you created.
If, like me, you are a bit of an altered book artist, you are always looking for new projects. I just happened on this – a fabulous tutorial from Annie Shao of Hungry Panda Clothing:two styles of handbag, one with handles, one a clutch bag!
How fabulous is that! If you’ve got great covers but horrible pages (water damaged, mildewed etc) then get rid of the page block and turn your covers into a bag!
Here is the full tutorial – including how to make the lining. I’ve seen similar in various art mags but this is the best tutorial I’ve seen – great step-by-step photographs, and very clearly explained. And not too much sewing! (I wonder if I could cheat and use glue? Iron-on tape? Rivets or eyelets?)
For an even more retro look, I’ll be looking in haberdashery shops to see if you can still get those bamboo handles – and I’ll also be haunting charity shops, garage sales, jumble sales and car boots for crappy old handbags with great handles. And buckles, buttons and other trims for the clutch bag. For anyone not so convinced about the old book cover look – does anyone remember Cosmopolitan magazine’s great reader offer (must be around 15 years ago – that’s really showing my age, lol) of a magazine cover as a clutch bag? That really did look something… mine was Vogue. So you could use a strong PVA or gel medium – or even Xyron – to adhere the magazine cover over your book cover base, then go over that with clear sticky-back plastic to make it waterproof, then go ahead with the rest of the tutorial. Polka dot fabric, retro 50s prints… very Cath Kidston!
Here are some links for more bags in different styles:
A rather long-winded but very thorough YouTube tutorial for a fold-over clutch:
TIP:
When sewing through plastic make sure you use large stitches: nylon thread is best. If you find it difficult to sew, try placing a piece of tissue paper over the plastic (or even tissue paper top and bottom, and lower your feed dogs) and sew through it all. Then tear the tissue away from the stitching when you are done!