Monday, August 30, 2010

NEW TEMPLATES - INSTALLING & CHANGING

By now, you'll have seen the new Template Designer facility on Blogger and may have experimented. You may also have a custom background and wonder whether it will work templates other than Minima.

The answer is YES - with the proviso you read this tutorial very carefully first, so you don't lose anything you want to keep on your blog.

Make sure you save your blog template
First thing to do before you do ANYTHING is to save a copy of your blog. This takes seconds - and you may be very glad you did, if you like experimenting with layouts and then save by mistake and lose all your widgets!

CHANGING TO ONE OF THE OLDER TEMPLATES

If using one of the old templates, make sure you Preview (link under the template) FIRST before you apply it, in case you don't like it.  Also, you'll be given the option to Save Your Widgets, so make sure you click to save your widgets or you will lose them permanently.

Be aware that any template changes you made to your html (numbered comments, signatures, post dividers etc) will be lost and will have to be reinstalled

INSTALLING USING ONE OF THE NEW TEMPLATE DESIGNER TEMPLATES

The new Template Designer templates show in a split screen as you are working, so whatever changes you make will show immediately. When saving the template you'll be given the option to save your widgets, so make sure you click to Save Your Widgets or you will lose them permanently.

Be aware that any template changes you made to your html (numbered comments, signatures, post dividers etc) will be lost and will have to be reinstalled.

I'VE GOT A CUSTOM TEMPLATE

Q: Can I use one of the new Designer Templates with my custom (or freebie) template?

A: Some work better than others - some want to default the design shown, and some will add a thick horizontal strip behind the header and across the top of your blog background. Preview it first - you may like the result, or you may not. If you don't save it, it won't install. If you did save it, hopefully you saved a copy of your blog to your hard drive before you started playing (whch you can simply reload, no damage done).

THESE TEMPLATES WILL WORK BEAUTIFULLY:
  • Choose from any of the Picture Window choices.
  • Choose from Awesome 1, 2, 3, 4 or 6
  • Choose from Watermark 1 and 2
AVOID:
  • Awesome 5 (this will give you a white horizontal box right across, behind your header)
  • Watermark 4 and 5
  • Simple (all of these will give you a broad horizontal box right across, behind your header)
HERE'S HOW IT WORKS

Stretch Minima
This is one of my backgrounds using the Stretch Minima template - which also works well with other templates, especially the new Template Designer ones.

Now let's change the actual template:

Click on Design - Template Designer - Templates
LAYOUTS: I've chosen AWESOME template No 3

This is the default design for this particular template - you can change this (see tutorial link below)
BACKGROUND: This is the default background. Let's change it.

You can see this is the default background - I've selected NO IMAGE
By selecting No Image some templates will default to the main colours of your blog background, and others will give you a choice of ticking a colour - or Transparent (ie: no colour). So your custom background will show exactly as it should.


LAYOUT: Here is where you can adjust the actual layout  (number of columns etc) plus the width of your blog and your footer options (columns, no columns etc)

Advanced options: fonts - sizes, colours etc
ADVANCED: You can adjust the font, the colour, the size etc. Also the default title if you don't want to use an image for your banner or header. In Designer, the area where you make your changes is easy to see: it's outlined very clearly.

More adjustments
Here you can see what adjustments I have chosen.

Final tweaks
If you don't like the colour options shown, click the arrow to the side of a box to bring up a larger box showing colour wheel and transparency options.

HOW TO CHANGE TO ONE OF THE OLD-STYLE TEMPLATES

Older template option
Click on Design - Edit HTML, which will bring you to a new page showing the older Blogger templates.

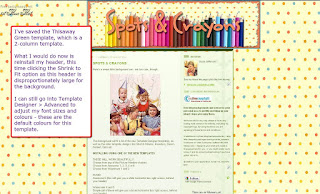
Thisaway template
I've chosen THISAWAY in the green option. I'm still using my original Stretch background and header, and have only uploaded this template. You'll notice all the fonts etc have changed to the Blogger default for this template.

Template added to same Stretch background
You can see the header size is all wrong! This is a 2-column background with a set width (unlike the Designer ones, where you can set the width yourself).

Adjusting header width to fit your template
I've deleted my header, then reloaded it - this time I've clicked the Shrink To Fit option, so the header fits the background correctly.

The result
That's much better! Now I'm changing the template again - this time to STRETCH LEFTY.

Another template: STRETCH LEFTY
The Stretch Lefty template defaults the fonts etc again, so I'll need to adjust these. I also need to remove the two thin borders around the header area as they don't look right with my banner.

I also have the option of NOT using my banner, and use Blogger's default text for the header. In this case, I might prefer to keep the borders - but make them thicker and more punchy.

Removing Blogger's default borders from around the header
To remove the borders, go to Design - Page Elements - Edit HTML and scroll down until you find the Header section (see pic above).

This is how it will look
Change the numbers - to remove the borders change the numbers to 0. To make them more punchy, make the numbers larger (3px or 5px are a nice size). The two borders don't have to be the same thickness, either.

The result!
I've changed the font size and colour, removed the borders and this is the final result. Minima Lefty has a transparent template, so you see the whole pattern of the design.

Again, I just want to remind you that saving any of these templates will result in your losing any customisation (like removing the borders round the header, for example). You will be prompted to save your widgets - but nothing is foolproof, so if you have loads of widgets, make sure you save your template FIRST.
    FURTHER TUTORIALS

    The new Blogger Templates
    Adjusting and centering Blogger's default header
      I've also put this entire tutorial on my Computery blog, for archiving.

      Monday, August 23, 2010

      GLIMMER MIST - TATTERED ANGELS

      Copyright Susie Jefferson
      I've been playing with my new Glimmer Mist sprays - any excuse, really!

      Copyright Susie Jefferson
      I sprayed a background, then overstamped just a little, added a bit of shading on the edges... just playing but oh! what a beautiful result. I love the glimmer and the shimmer - subtle, not over-the-top, but definitely there.

      I also used the stamps from the Tattered Angels butterfly set, and the large heart from their Glimmer Screen pack. The butterfly is stamped on the background, stamped again and cut out then mounted with a little silicon gel, and finally stamped for a third time (and embossed) onto acetate. Very dimensional!

      Here's the link for general tips and advice, and my new class using all the Tattered Angels goodies is on Saturday 18 September.

      Wednesday, August 18, 2010

      MARILYN'S ALBUM

      All photographs copyright Marilyn Saunders
      Marilyn Saunders (another of the ladies who took my Gerrards Cross Japanese Stab-bound albums class several weeks ago) has just sent me photos of a new album she's just made.

      Beading detail on binding - beautifully matched and sized!
      Closeup of beading detail on spine
      Detail of clasp
      I have to say that I'm wildly impressed! 

      Hand-stamped cover paper, satin ribbon binding over-bound with beads... wow and double wow! (wish I'd thought of the beads....)

      Friday, August 13, 2010

      PINK SATURDAY - BIRTHDAY GIVEAWAY WINNERS & FLOOD

      Welcome to Pink Saturday once again - and big congratulations to the winners of my Birthday Giveaway!

      I decided to hold the giveaway over to another week, so have in fact picked TWO winners. 

      The winner for Pink Saturday 7th August was RINI from Catharina's Love

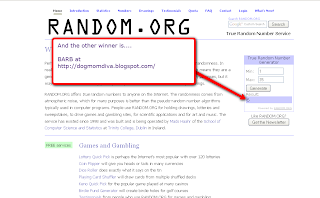
       The winner for Pink Saturday 31st July was BARB from Dogmom Diva.

      You both get to choose what you'd like: a header, blinkie or a button. I'll right onto it as soon as I hear back from you!

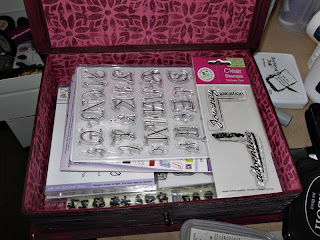
      Most of my alphabet stamps
      I had an email asking what I put in the book box I decorated (tutorial in my last PS post) so I thought you'd like a picture - and here you are. As you can see, it holds loads!

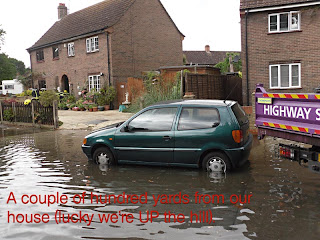
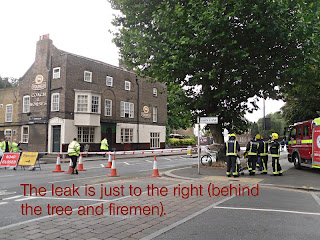
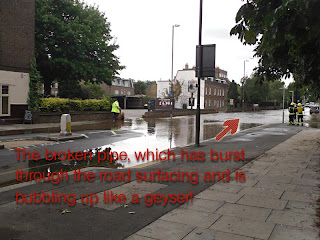
      The Event of The Week was the burst water main yesterday - it even made the national news!

      We were cut off with no water from breakfast time until pretty late last night, and luckily we live a couple of hundred yards away, and up a small rise.


      The poor people opposite the Coach & Horses Public House (a small parade of shops and a large residential area) weren't so lucky.


      Those on the Brenford side of Syon Lane (us) escaped the flood.


      Those on the Iselworth side (the other side of the road) are where the road dips down... with catastrophic consequences. They were totally flooded out, everything on the ground floors ruined. There's a lot of Local Authority houses, so many people don't have insurance... however, I rather think Thames Water will be paying out a LOT in compensation. What caused it? Victorian pipes - I think  after 120 years or so, it's high time they were replaced.

      Vintage Fashion - copyright Toh Ee Siew at Palette of Colours
      Vintage Fashion - copyright Toh Ee Siew at Palette of Colours
       My Blog of The Week is Palette of Colours: Toh Ee has posted 'Vintage Fashion' - her totally amazing altered book. Do go and take a look - it is truly beautiful.

      pink saturday

      Finally, please visit Beverly at How Sweet the Sound to see all the other wonderful Pink Saturday posts!

      Thursday, August 12, 2010

      MARGARET'S ALBUM

      Margaret (one of the ladies on my Gerrards Cross Summer School course) sent me a pic of her finished album.

      Done in the class - photos copyright Margaret Isaacs
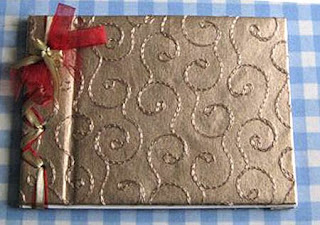
      All finished with embellishments. The perfect Golden Wedding album!
      Thanks so much for the photos, Margaret - this album is lovely, and I'm sure was the perfect present for a perfect day!

      I particularly like the little bows you inserted along the binding - an idea I'm definitely going to pinch! Why didn't I think of that?

      Tuesday, August 10, 2010

      NEW CLASSES FOR AUTUMN ARE UP!

      Altered Book class at Rainbow Silks. Copyright Susie Jefferson.
      Closeup of embellishment details. Copyright Susie Jefferson.

      All the new classes are up on the Blade Rubber Stamps blog and website, and also my classes at Rainbow Silks.

      Fairy album - A3 size - copyright Susie Jefferson.
      Closeup of stitching detail. Copyright Susie Jefferson.
      Albums by students at my Gerrards Cross Summer School class last week.
      Due to demand, I'm offering an extra class at Blade Rubber Stamps: a full day class on Sunday 19 September, on Japanese Stab-bound albums and journals.

      This will run from 12.00pm-4.00pm - a lovely way to spend a Sunday afternoon! Space is strictly limited to 7 students, so if you want to come please phone BladeRubber Stamps on 020 7831 4123 to book your place.

      The price will be £30.00 for the day. Full details for this class are on the BladeRubber links at the top of this post, and also on my website.

      Friday, August 6, 2010

      PINK SATURDAY - BOOKS, PROJECT & GIVEAWAY (CONTINUED)


      First off, I'm keeping my Birthday Giveaway open over this weekend - so leave a comment here or on my previous Pink Saturday post to win a blog header or a button or blinkie, designed by moi myself! 

      I didn't get a lot of visiting done last weekend, as we were out most of the time, so I obviously didn't get many visitors either... so to be fair, I'm holding the giveaway open this week as well. I know I promised to announce the winner today ... well, it'll be next week instead.


      This week, I've been frantically busy (invited to teach again at the annual Gerrards Cross Summer School) so Wednesday I was teaching Japanese Stab-bound albums.


      Here are a couple of the books the group made - I had 11 students, but we didn't discover we had a camera in our midst until after a few ladies had already left. So they missed out there. Brilliant, aren't they!

      Cover a book box

      I had a very boring Kraft papier mache book box that I keep my unmounted alphabet stamps in. It's so boring, I decided to do something with it! Then I thought it might be a good idea to share....

      Boring plain Kraft papier mache box
      I prepped the box inside and out with burgundy acrylic paint. I lined it with Khadi paper (heavily textured, handmade) in a strong pink which I overstamped with more burgundy paint and my toys: hand carved wooden blocks from Colouricious.

      Heavily textured Khadi handmade paper
      The paint was applied to the block with a sponge brush, and you can see the very simple repeat pattern: from the left, just stamped from top to bottom. 2nd from left, pattern dropped half a repeat down, 3rd from left starting at the top again, etc. Due to the heavy texture of the paper, the pattern didn't stamp perfectly - enhancing the handmade effect. (If you want a perfect repeat, use smooth paper).

      I sprayed the hinges for my other book green, using the inside of this box to keep the spray away from the table, sorry! If you want to see the book, scroll down to the post before this one.

      The box is painted inside and out, the small piece is the left side lining paper and the larger ones are for the top and inside the box part - all in one piece, sides and bottom.


      Side paper glued in. You'll notice a slight overlap at the bottom - making sure there are no gaps. I used ordinary PVA gle (white glue, dries clear).


      The inside of the finished box. You'll note I didn't glue paper over the hinge as this is a tight-fitting lid.

      A heavy application of gesso on the stamp and more repeat patterning
      The outside of the box - a different stamp. I used gesso (again, applied with a sponge brush).


      I didn't like the gesso - too stark. So I overstamped with Lumiere's Crimson (pearlised deep red) using the first block (the one I stamped on the paper for the inside of the box).


      I did two rows of stamping, then blended in with a soft cloth before the acrylic was completely dry. This blended the paint a little, but still left a very dimensional broken texture.

      Finished!
      The finished book. Possibly still a little too floral on the cover for my taste, so I'll probably go ahead with some collage at some point. Or maybe it needs some text. Or not. I'll see how I feel in a day or so.

      Showing the fastening and 'page edges' detail
      Detail of the 'pages' I drew in with a dark grey Copic market. I overdrew with an opaque white pen (Ranger). The fastening is a piece of Grungeboard, cut to size and the corners rounded, then painted and stamped to match. I made two holes right at the top and applied eyelets (too thick to crunch, so I cheated with two sets applied from top and bottom to meet in the middle, with an application of Diamond Glaze glue and a whack with a hammer).

      This meant there was a little too much movement of the Grungeboard just at the fore edge, so I made another hole and added two more eyelets in the same way (you can see there's an overhanging lip, so that's where I made the hole). To finish the fastening, I punched a large hole at the end of the Grungboard, and a small hole in the side of the box - then screwed in a hitch fastener. The Grungeboard hooks over beautifully.

      Why bother? I carry the box (and contents) to classes, so this stops everything falling out. Nice, neat and secure - and now a lot more interesting to look at.

      My Blog of The Week has to be Colouricious's blog - some great techniques and YouTube videos there, especially if you are interested in fabric art.

      pink saturday

      Finally, please visit Beverly at How Sweet the Sound to see all the other wonderful Pink Saturday posts - and don't forget to leave a comment if you want to win that blog header & button!