I thought it was the Pink Saturday anniversary last week - but it wasn't - it's THIS WEEK! Hurrah!
So here is another digital birthday card for you (free for personal use).
Copyright Susie Jefferson
Don't forget to check out my last two Pink Saturdays for another birthday card and some Word Art for you all.
My Blog of the Week is Amanda Taylor's blog TaylorMade Designs - a great scrapbooking site with some freebie papers, great tutorials and totally wonderful photography.
Finally, don’t forget to visit Beverly at How Sweet the Sound to see all the other wonderful 2nd birthday Pink Saturday posts!
I get a free newsletter from one of the It sites, and found this great (free) link for you - UNSHAKE. It un-shakes and de-blurs your blurry, shaky photos and pretty much makes them decent pix again.
You'll have to experiment (just a little bit) to get the right settings, but UNshake is 100% better than deleting or throwing those photos away!
So it's official, I have a trendy blog, lol lol lol.
Thanks so much CC, you're a star! And considering you had a terrible fall yesterday and fractured your pelvis, I'm amazed you could sit at a computer to send it to me. Which makes me feel doubly honoured.
In receiving this award, I have to promise to:
Post about the award in my blog.
List your Top 10 Trendy Blogs
Share with them
Leave a link to the Trendy Blog Button
Tell them they need to give this award out to 10 as well
Here are my Top Ten blogs (in no particular order):
Happy Birthday to Craft Stamper and 10 great years - and here's to the next 10!
I'm very happy to say I'm in this issue - in the Ideas Gallery. This month, the theme was Matchboxes - and I used one of those giant boxes of household matches to make a little Keepsake Box.
Photograph copyright Craft Stamper magazine for Traplett Publications Project copyright Susie Jefferson for Blade Rubber Stamps
Above is the page (my project is top right, using a sheet of embossable metal foil). And here it is in glorious closeup.
Pink Saturday has been going for two years! So this week I'm doing something special and a little different: presenting my very first attempts EVER at Word Art.
Copyright Susie Jefferson
Free for PU and S4H, so download away! These are png files, 300dpi so plenty large for conventional scrapbooking plus digital. Left-click to ge the full sized image, right-click to save to your computer.
Here's another one:
and with a grungy frame (see my pic above):
Layer these in your graphics programme with any coloured or patterned background (place the colour layer above the Word Art layer) then Group With Previous to merge the images.
Finally, don’t forget to visit Beverly at How Sweet the Sound to see all the other wonderful 2nd birthday Pink Saturday posts!
Roben-Marie has put the freebie mask and frame links right underneath the videos on her tutorial page.
As you all know, I do a fair amount of digital stuff (the blog backgrounds etc) but with Photoshop, there's always another way of doing things: tips, tricks etc - so I'm putting these tutorials right here so I don't lose them. For a starter (being self-taught) I never knew about that 'hold down the shift key' tip!
I love the old movies - most had a glamour and elegance you just don't see today.
Especially the old gangster movies: the Film Noir genre.
The men were Tough Guys, the women were Women with Attitude, and the plots (and one-liners) were lethal!
This week's Pink Saturday post is inspired by this YouTube film by RubyTuesday717 - I just had to share!
Watch with the sound ON for maximum effect - the soundtrack (Massive Attack) is wonderful.
I wonder how many stars you recognised? Here are just some I recognised immediately (that shows my age, lol):
Fred MacMurray : Richard Widmark : Burt Lancaster : Edward G Robinson : Robert Mitchum : Humphrey Bogart : Peter Lorre : James Cagney : Orson Welles : Sterling Heyden : Barbara Stanwyck : Bette Davis : Jean Simmons : Carole Lombard : Ingrid Bergman
This week's Blog of The Week is Stephanie at Queen of Dreamz - who has an enormous blog with loads of wonderful links. She hired me to help with the coding, and has completely restructured her blog from the ground up. There's a lot of work behind the scenes you probably won't even notice: extra widget boxes sized to the sidebars, vertical divider which goes right to the bottom of the sidebar/posting area etc - we worked together over several sessions for the better part of three days !
What you will see is the result - bigger, brighter, clearer, cleaner - easier to navigate and with wonderful BIG pictures. I hope you'll go and visit, and praise her for all her hard work.
Finally, don’t forget to visit Beverly at How Sweet the Sound to see all the other wonderful Pink Saturday posts!
The big secret is walnut ink. I have some of that! (Been unused at the back of a drawer for around 3 years, so I'm finally going to get some use out of it, hooray!). I also like her little touches of velvet leaves etc.
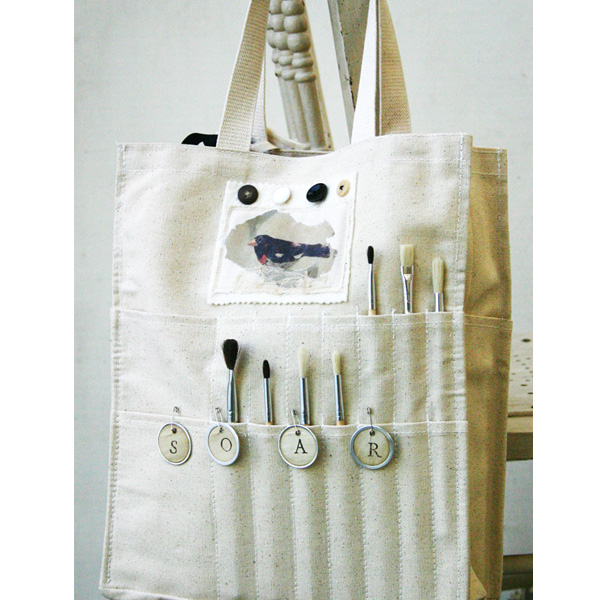
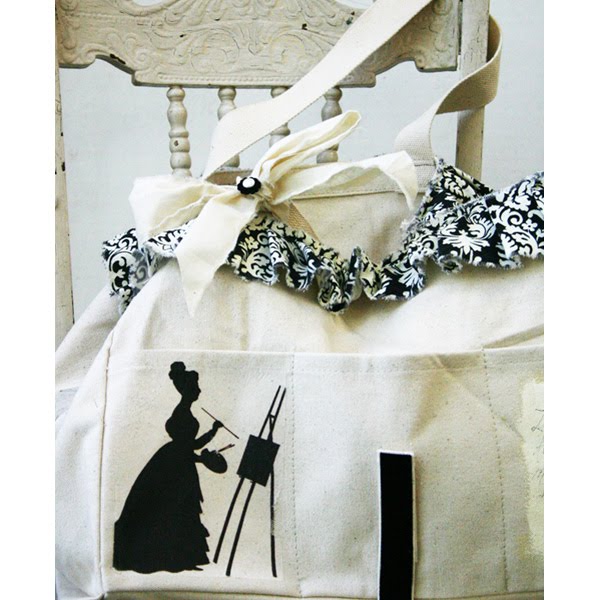
Here are the other two projects, each very different, featuring the same basic canvas bag. Aren't they brilliant!
Begin by transferring images of birds onto canvas fabric. To create image transfers make a color copy of the images you’d like to transfer. (I use the copy machines at Staples to make my copies.) Before printing each copy, select the reverse copy option and adjust the image size accordingly.) Cut around the photocopy image and use a sponge brush to spread gel medium (Golden, regular matte formula) onto the image. Then flip the image over and press it onto the canvas. Use a brayer over the back of this image to make sure that there’s enough contact between the photocopy image and canvas. Then allow the gel medium to dry. Once the gel medium is dry, peel off the paper. Your image should be transferred. If the paper is difficult to remove, apply a water-dampened sponge over the image and let it sit for a few minutes. Then use your finger tips to gently rub off the excess paper. Allow the canvas with the transferred image to dry.
To create my black, white and red bird patch use scissors to trim around the bird images into a rectangle. Cut a small piece of lace scrap to fit along the bottom of the bird and sew to attach. Cut a piece of organic cotton batting slightly larger than the canvas with the bird image. Then place the canvas rectangle with the bird image on top of the batting and arrange color coordinated buttons across the top. When you’re happy with the button placements, temporarily remove them and sew the canvas with the bird image onto the batting. Then hand stitch the buttons to the batting. Use an embroidery needle with thread to add a French knot detail to the bird’s eye. Use pinking shears to trim around the top and bottom edges of the batting. Apply craft glue to the back of this batting patch and adhere it to the tote.
Use Staz-On ink to stamp letters (ex. s, o, a, r) onto tea-dyed office supply tags. Attach the tags to the tote using mini-safety pins.
For the “search” patch, cut a piece of canvas into an elongated rectangle shape. Then cut a piece of organic cotton batting and a piece of vintage striped fabric to fit under the canvas. Use letter stamps and Staz-On ink to stamp a word (ex. s, e, a, r, c, h), then use pinking shears to trim around the edges. Sew this canvas along the edges and on top of the batting (be sure to leave space at the top of the batting for a row of buttons.) Hand stitch the buttons on to the batting. To finish this patch, sew the batting to the striped fabric along the edges. Apply craft glue to the back of this batting patch and adhere it to the tote.
For the mini-batting patch (for the tote handle), trim around the transferred bird image. Then cut organic cotton batting, canvas and tea-dyed used dryer sheet into rectangle shapes. Place the bird image on top of the canvas and dryer sheet and sew it around the edges to attach. Next, cut a piece of fabric tape measure to fit across the canvas and dryer sheet, and embroider stitch an “x.” Place the tape measure on top of the canvas and tea-dyed used dryer sheet (under the bird image, and leave some space for a lace scrap nest) and sew it around the edges to attach. Attach the canvas fabric to the top of the batting base by sewing along the outside edges. For the nest, cut tiny pieces of antique lace and adhere them to the bottom of the bird using craft glue. Lastly, use a safety pin to attach this patch along with color-coordinated ribbons to the tote handle. As a bonus, this mini-bird patch can be used as a bookmark.
1. Begin by printing the silhouette onto either muslin or iron paper and set aside to dry per manufacturer’s instructions.
2. Using your sewing machine or hand stitching, attach printed fabric to the top of the bag; gathering as you feed the fabric through the machine. Using a straight stitch as well as a heavy thread will insure the fabric will remain in place nicely.
3. Cut or tear out a piece of your printed fabric measuring roughly 5x5. To the top of this add a piece of muslin that has the word delight printed on to it or stamped on to it. Embellish with a strip of trim. Sew this to the center of the bag on the back side.
4. To the sides of the bag stamp an image or scroll using StazOn Ink.
5. Iron on or sew on the silhouette image to the pocket.
6. To the top of the Velcro (which holds the bottom closed) either sew or glue with a piece of velvet ribbon over the top of it.
7. Onto the left hand pocket of the bag add a layer of white and crème acrylic paint that has been mixed together. It is a good idea to place a piece of cardboard or heavy cardstock within the pocket as this will protect the inside fabric.
8. Using a piece of torn muslin created a bow that will be placed on one of the bags handles. Add a favorite button to the top.
9. Finally add a bit of journaling to the painted area you created.
Images and projects copyright Stampington and the individual artists
Stampington has done a great altered tote bag project (3 bags, 3 artists) plus a nice little video by Roben-Marie Smith, one of my very favourite mixed media artists.
The big secret is walnut ink. I have some of that! (Been unused at the back of a drawer for around 3 years, so I'm finally going to get some use out of it, hooray!). I also like her little touches of velvet leaves etc.
Here are some more pix of the other bags. Full details including How To instructions are on my Techniques page:
Copyright Kristen Robinson
Copyright Becky Shander
I like this project so much that I'm putting the whole thing, with instructions for all three bags (therefore one HUGE post) onto my Techniques page, which is where I archive all this stuff, in case you have never looked there before (button under my header at the top of the blog).