Copyright-free pic from Flickr
Does your New Post text box look like this?
If not, you need to update your tools.
Here's how:
Go to Settings > Basic
Scroll right down to the bottom of the page, and you'll see this:
Click on it! You now have the new Editor.
OK - done that... now what?
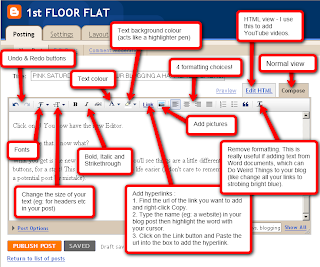
What you get is the new New Post text box, and you'll see things are a little different. You get Undo and Redo buttons, for a start! This is guaranteed to make life easier (I don't care to remember how many times I wiped a potential post by mistake).
Next to the Undo and Redo buttons, you'll notice button F - which is the font button. Your font is set via Layouts > Fonts & Colours, where you set the main fonts, sizes and colours for the entire blog. The F button changes the font within a post, eg: a header where you want a different typeface to really stand out. I have used Arial to label the top photograph.
T - this changes the size of the text. My first paragraph is Large, and the top photograph is typed in Ariel, Small. This sets it apart from the body of the text and makes it visible without being too prominent.
B button is BOLD
I is for ITALIC
A is the text colour. Again, I'd use this for emphasis - perhaps to highlight links or text you particularly want to be noticed.
The highlighter symbol . Again, highlight text with your cursor, then press the button (the little arrow allows you to choose your colour). Great for links within a post!
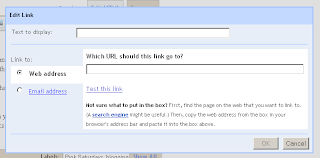
Link - add your hyperlink. NEW - you can add email addresses.
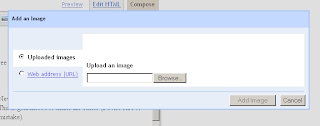
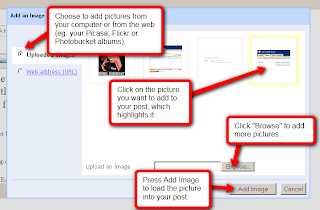
The picture button lets you upload pix one at a time into the box. Click on the picture you want to add to your blog, then click Add Image and it will appear where your cursor is in the body of your blog post. This is NEW - all pictures used to load at the top of your post, which was highly frustrating. And the Preview didn't help much either.
Select Small, Medium or Large (this is the thumbnail size of your image - clicking on it when published will still bring up the full-sized picture) and Left, Centre or Right to position it. These pix are all Medium and I set them all Left.
We're all familiar with the appearance of our text: left, right, centred or justified . Full justification is a new option.
We are also familiar with numbered or bullet-point lists as well.
The quote marks highlight a paragraph like this, in case you aren't familiar with this funtion.
Tx - this removes the formatting from a piece of text. Especially useful if you've copied a passage of text from Word, as this can Do Strange Things to your post - as when all my links suddenly went blue, and I couldn't change them. I had to go through and delete all Word formatting from every single affected post!
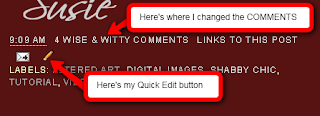
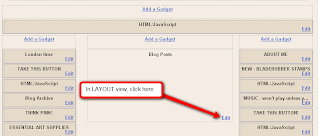
And once you've hit Publish Post, you'll see a little pencil icon. Click on that to edit the post - no more going to Customise > Dashboard > Posting > Edit Posts. Don't see that icon? Then you need to go to Layout view, and click Edit in the main posting block, as shown below.
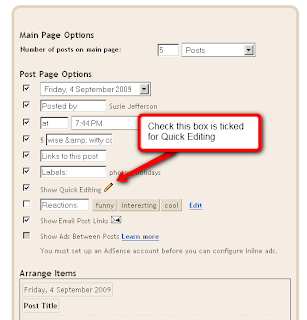
When in Edit, you'll see this:
Check the Show Quick Editing box, and save it.
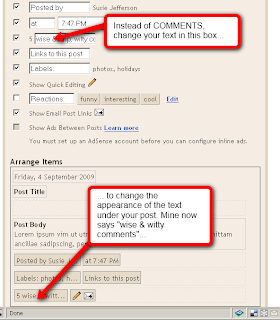
Whilst we're at it, why not change your COMMENTS link. You know, where it says 0 COMMENTS or 51 COMMENTS. Why not change it to something more interesting, eg: ... lovely people left a comment.
Here's how:
And here's how it looks on the page!
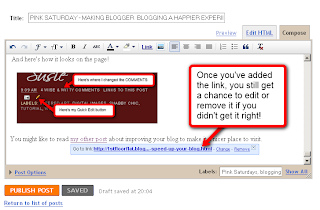
You might like to read my other post about improving your blog to make it a nicer place to visit. (Notice how I highlighted the link?)
This is how adding the link looks in the new editor:
And you get to proof-read it as well, before finalising it.
And finally....
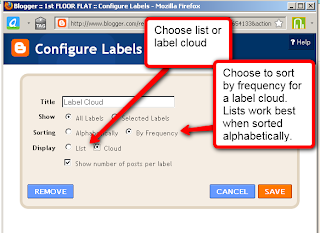
Add a label cloud! Way nicer than lists - although lists have their place too. Go to Layout > Add a Gadget > Label, and choose your settings.
If you don't like the look of Blogger's label cloud, here's my earlier post on how to customise and install your own.
Click this link to visit Beverly's blog How Sweet the Sound to read the rest of the Pink Saturday posts.





No comments:
Post a Comment