Showing posts with label altered books. Show all posts

Monday, June 13, 2011

ALTERED BOOK ARTICLE IN CRAFT STAMPER JULY 2011 - BRAG TIME

Pix copyright Craft Stamper Magazine, artwork copyright Susie Jefferson
Just a quick note for you all - I'm in July's edition of Craft Stamper Magazine - I was too late with my Altered Book submission, but am in the Web Extra section - and they've published the article as a downloadable pdf if anyone is interested!

Here are some of my own pix, so you can see the details better:

With the extended page (on the left) closed
Closeup detail, showing the lace at the edge
And now with the extended page open:

With the extended page (on the left) open
Closeup of the extended page and pockets with tags inserted
Closeup of the slide mount detail on the right-hand page
I got a mention inside the front cover, and they've done a lovely job with the photography in the article. Nice, huh?


I'm quite excited about it - it's a new idea that Katy Fox (Editor) is trying out - more eye candy in the magazine, instructions on the web.So more room for photos, and photos are bigger too!

Here's the link again for the downloadable pdf tutorial.

Friday, January 28, 2011

PINK SATURDAY - CAPRICES

Page after title page
For this week's post I'm shorter on time than I'd like - so here's some pages from my altered book 'Caprices'.
The back of the book with a hidden window
Showing the niche inside the window, and the drawer in the side
Another view, showing the little drawer and the bottles in more detail
Hope you like them!

It's been a hysterical week - trying to list a book on Etsy and a clearout of rubber stamps and art supplies onto eBay - it takes FOREVER to list things.

I've also put the last of my videos onto YouTube and my page here - it all takes time (see post below as well)!

So I haven't even managed to do much Pink Saturday visiting! I'll try to do better this week and catch up a bit.

pink saturday

Finally, please visit Beverly at How Sweet the Sound to see all the other wonderful Pink Saturday posts!

Friday, September 24, 2010

PINK SATURDAY

My alter ego...

This is my first Pink Saturday post for ages - time has a nasty habit of slipping away.

This week I'm posting early - tomorrow (Saturday) is the stamp show at Alexandra Palace in London - all I'll say about it is: bring a suitcase (on wheels) and a lot of money. Can't wait! I'm going with an open mind, which is always fatal...

Here's my current favourite display picture showing a great way to mix mirrors and pictures:

From Homes&Gardens
And the desk I'd like....

From Homes&Gardens
Just think - pull down the roller top and hide all that mess! And a nice drawer for paperwork instead of little piles here and there... Love that birdcage by the lamp (always wanted one). This is my kind of decorating: nice pieces, nice clean look. Shame I never seem to achieve it! Lots of designers say Less Is More. In my case, More Is More.

Here some pix of the most amazing chair - the chair will be translated into a album or book at some point, I'm sure.

Chair copyright Sarah Louise Dix
I did this album (now sold) with exactly that cross-garter effect stitching.

Copyright Susie Jefferson
View from front - copyright Susie Jefferson
And this is an altered book spread I did a couple of years ago:
Left-hand page closed - copyright Susie Jefferson
Left-hand page open to show extension. Note the cross-garter ribbon effect at the top of the pockets and the right of the page. The slide mounts show a detail of the corseted woman (on the left page) and are mounted over the magazine cover.
There's definitely a theme re corsetry here... an obsession I didn't realise I had! Although I do remember going to school wearing a roll-on girdle and stockings - about two years later they introduced tights (panty hose). What a revelation! Freedom! Comfort!

pink saturday

Finally, please visit Beverly at How Sweet the Sound to see all the other wonderful Pink Saturday posts!

Monday, March 1, 2010

MAKE A HANDBAG OUT OF A BOOK


If, like me, you are a bit of an altered book artist, you are always looking for new projects. I just happened on this – a fabulous tutorial from Annie Shao of Hungry Panda Clothing:two styles of handbag, one with handles, one a clutch bag!

How fabulous is that! If you’ve got great covers but horrible pages (water damaged, mildewed etc) then get rid of the page block and turn your covers into a bag!

Here is the full tutorial – including how to make the lining. I’ve seen similar in various art mags but this is the best tutorial I’ve seen – great step-by-step photographs, and very clearly explained. And not too much sewing! (I wonder if I could cheat and use glue? Iron-on tape? Rivets or eyelets?)

For an even more retro look, I’ll be looking in haberdashery shops to see if you can still get those bamboo handles – and I’ll also be haunting charity shops, garage sales, jumble sales and car boots for crappy old handbags with great handles. And buckles, buttons and other trims for the clutch bag.
For anyone not so convinced about the old book cover look – does anyone remember Cosmopolitan magazine’s great reader offer (must be around 15 years ago – that’s really showing my age, lol) of a magazine cover as a clutch bag? That really did look something… mine was Vogue. So you could use a strong PVA or gel medium – or even Xyron – to adhere the magazine cover over your book cover base, then go over that with clear sticky-back plastic to make it waterproof, then go ahead with the rest of the tutorial. Polka dot fabric, retro 50s prints… very Cath Kidston!

Here are some links for more bags in different styles:

PAC(con)_A_md Copyright Mylinda at Chipwrapperpurse
A rather long-winded but very thorough YouTube tutorial for a fold-over clutch:


TIP:

When sewing through plastic make sure you use large stitches: nylon thread is best. If you find it difficult to sew, try placing a piece of tissue paper over the plastic (or even tissue paper top and bottom, and lower your feed dogs) and sew through it all. Then tear the tissue away from the stitching when you are done!

You can tell I’m feeling very inspired…

ENJOY!

Friday, February 12, 2010

GEL TRANSFERS

Copyright Susie Jefferson
I love these!  Very easy to do: use a gel medium (matt preferably, although I have used semi-gloss and gloss successfully) and smear onto the receiving surface (paper or a smooth fabric, eg: muslin, calico) with your finger - not too much!

This method works with: inkjet prints, newsprint, cheap (toner-based) photocopies.
 
This method is not very successful with glossy paper (ie: High Fashion magazines, travel brochures).

Place your image face down onto the wet gel and burnish well with the back of a spoon.  Work quickly, as this takes only around 30 seconds to start bonding.  Keep lifting an edge of the image to see whether it's "taking", and whip away the image as soon as it looks OK.

Copyright Susie Jefferson
And if you have enough of the transfer left over on the paper, you can collage this on the opposite page for (faded) reverse image. Two for the price of one!

If you have left it too long, and can't get the image off ... don't worry.  Allow it to dry completely, then wet the back of the image, using a sponge, and rub away with the pad of your finger.  Keep rubbing until you have all the "spills" removed - rewet if necessary - and the image will show underneath. If you allow it to dry and it's a bit cloudy, this means you still need to wet and rub - just a little longer.

This method is very hit & miss, but it's part of the charm!

Another way to make this work: photocopy or print onto an inkjet transparency. Use matte medium or gel medium on your substrate (receiving surface) and lay the transparency face down and burnish well. Leave alone for a couple of minutes, then peek to see if the transfer has taken.

RECYCLING OLD SKETCHES

The third brilliant YouTube video I found today, from Christy at GulfSpr1te. 

This one is very interesting to me, as it shows a complete journal spread (in 3 minutes!) showing a recycled sketch. Torn out of a sketch book, this is then turned into a complete journal spread (in 3 minutes) incorporating gel transfers as well.


As someone who has a pile of odd things doodled here and there (and that pile of huge life drawings still in a folder under the bed, as there's nowhere else to put them) this really has given me an idea of how to use them up.

 
One of my typical journal entries - planning my new website layout. (See why my scribbles need livening up?)

I have a lot of half-started sketchbooks, and my worst is the pile of journals (several where I tore out ALL the pages, meaning to re-bind them) which is around 8 inches high. Which I just didn't know what to do with. So here we are!

And - now I have the sewing machine out (having just done the kitchen curtains in yellow gingham - can we say YeeHah?) I may just sew some of the pages onto some decent paper.

This was when I was in my "Artists' Way" phase and journalled on just one side of the page (stream of thought, get it down on paper, write any old rubbish). My genius idea was then to turn the journals around and use the other side of the page - again, going in the same direction. So I have upside-down writing on one side, sketches, ideas, quotes etc on the other. All in non-waterproof gel pen. So you can just see the problem re glues and paint...

These videos have really given me some great ideas! Hope they inspire you as well.

Note to self: wonder if you could use one of those cheap web cams to do these little films?

REALLY EASY REVAMPED JOURNAL/ALBUM

Here's a sweet little video (just under 2 minutes) from Beth at wildgooseberrydotcom showing how to alter/recover a ring binder journal.


Revamp the cover, use cheap files for the pages - magic! and now you can use some of Traci's journalling ideas too (video in the post below).

I just adore YouTube (sigh...)

Thursday, January 14, 2010

MAKE A SPELL BOOK - HARRY POTTER STYLE

Photograph copyright Instructables

Here's a great item I found online - how to make a Harry Potter-style spellbook!

Project for adults only (due to sharp knives) there's also a bit about gold leafing. Fabulous! Wouldn't this make a great journal.

Instructables has some amazing projects, always with step-by step-photographs, and I also noticed items on a Harry Potter wand - and a Steampunk wand!

Wednesday, July 29, 2009

FAME AT LAST... CRAFTS BEAUTIFUL ARTICLE

I got my issue of Crafts Beautiful magazine this morning (Sept. issue) and it's got my Ask The Expert article in!

It's on page 94, just in case you needed to know that, lol.


There's also a nice little feature on my altered book ATC holder - the full instructions on how to make it are here in a little Slide gallery, or if you prefer your instructions static, they are on my website.


Fame at last, hey?


And another piece of exciting news: my stamp design for BladeRubber Stamps has been chosen for the cover freebie for Craft Stamper's November issue!

It just doesn't get better than this!

Tuesday, June 9, 2009

JOURNALLING

I just found these wonderful little video on YouTube - which sums up everything I feel about journalling. By Sirens Idyll.


Turn your volume up, sit back and chill...

Tuesday, April 28, 2009

VINTAGE FLAIRE - ARTIST OF THE MONTH


"UNDERSTATED" ELEGANCE

copyright Susie Jefferson

I'm absolutely thrilled to announce I have been invited to be Guest Artist of the Month for Vintage Flaire!

So I have put up a couple of articles now (4 card projects using vintage images, and an altered book spread).

If anyone would like to go and see - and maybe join Vintage Flaire, which is a ning social networking group - you'll be made very welcome. There is also a clickable button in the sidebar.

Here is the link: go to DT Gallery (Design Team) scroll down and you'll see my name!

Or go here for the vintage cards and here for the altered book spread.

How cool is that!

Monday, April 27, 2009

ALTERED BOOKS AS WALL ART


Here's a brilliant link for you - altered books as wall art!


Copyright CraftStylish designed by Jeffrey Rudell

Go to this link to see loads of variations on the theme - great if you've been stockpiling books like mad and now don't know what to do with them!

Left page: two sections, each folded separately. The folded top page fastens to the one underneath. The folded lower page fastens to the page in the main section of the book.

Right page: a dot of glue underneath at the point.

I've been using the fold to construct pocket pages: just attach the folded page to the next one following (paper clip, brad, eyelet etc) and run a line of glue underneath the bottom fold - then the top portion becomes a great pocket!

Wednesday, March 25, 2009

HOW TO STRETCH PAPER


I think stretching paper is one of those "need to know" things - but nobody talks about how to do it! So here you are.

Cirque 1 skinny book page by Susie Jefferson


SO, why would you want to stretch your paper?

Whenever you want to work with wet mediums (watercolour, acrylics, collage - anything involving paint, glue etc) and you don't want the paper to buckle. Very useful for ATCs, skinny books, fat books, deco books, as well: you can do a whole series, then cut them off the board when you have finished.

You can also leave stretched paper on the board for months (I left one board I forgot about for around 2 years) with no detriment! Stretched paper gives a great professional finish to any artwork - watercolours especially are spoilt if the paper has buckled.

I learnt this method when I was at art college, back in The Day, and having seen other methods (soaking with sponges etc) I think this is still by far the easiest way.

This is an A1 (parent-sized) sheet of heavyweight watercolour paper, by the way.
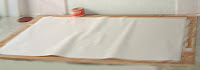


Dunk a sheet of paper in a bath or sink (depends on the size of the sheet of paper) with around an inch of water in it.

To do this, take the paper at the corners with your thumbs and forfingers (short edge) and dip into the water at one side, guiding the paper along the curve at the bottom of the bath and up and out at the other side.

Take the paper out straight away, shake the excess water off and then lay the paper straight onto your board (plywood, MDF etc). Smooth out roughly with your hand so it lays flat(ish) but not too much: let it lay how it likes.
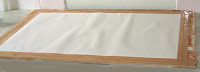


Use gummed brown paper tape, dip into the water, then place over the wet paper, long sides first then short sides. Don't worry about wrinkles in the centre of the paper as long as the edges are smooth. It'll sort itself out when it dries.


Place half the gummed tape on the paper and half on the board, making sure you overlap the edges.
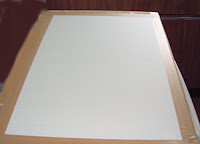


LEAVE IT ALONE until completely dry. You can stand it up on end to allow the water to drip off, if you prefer. When dry, you will see a beautiful expanse of absolutely flat paper!


Do all your work whilst the paper is still on the board. This means all paint, paper, glue etc. Allow to dry thoroughly. You can see here that I drew my guide lines on the board, leaving small margins for excess collage work. This was a series of 16 skinny pages, each 3 inches x 6 inches, all of them different.

When it's all dry, and your work completely finished - THEN you cut it off the board (use a metal ruler and craft knife). If you need to do more wet work, leave it on the board or you may still get buckling.


Cirque 2 skinny book page by Susie Jefferson


The poodle was from a packet of tissues (I tore off the top layer). Who could resist a poodle so PINK?


Cirque 3 skinny book page by Susie Jefferson


All these pages were perfectly flat, and bound beautifully!

Monday, March 23, 2009

CREATE YOUR OWN RUB-ONS

Just saw this great little video on YouTube: I just had to share!


Well, I think it's just brilliant. Who knew you could transfer from acetate this way? (by the way, it needs to be heatproof - don't use the acetate they use for document covers).

Friday, March 6, 2009

PINK SATURDAY - LITTLE BOOKS

Happy Pink Saturday to everyone!

Go and see Beverly's Pink Saturdays list at her brilliant blog How Sweet The Sound to see lots of Happy Pinkness.


I am going to make sure I visit everyone this week!


Little vintage notebook
copyright Susie Jefferson


This was just an ordinary shorthand notebook, which I altered/embellished.
  • I pulled the wire coil out, then recovered the covers with pink Mulberry paper, torn collage papers, a little German Scrap and torn vintage postcard.
  • I reassembled the book, and attached the wiring by placing a pencil on the top edge and wound coloured wire through the holes, over the wire (to keep that nice rounded shape) throught the holes, back around the pencil etc etc, and continued to the end, working from left to right.
  • I wound all the way back through the holes again, and finished off where I started by twisted the ends together (using pliers) to fasten. I threaded on tiny beads before I started winding the wire.
  • Finally, I added a tag (also pink, with more collage) and dangled it off the front of the book.


Wedding Organiser
copyright Susie Jefferson


This was a mini organiser in Kraft card (brown and dull, dull, dull).
  • I prepped this by swiping over the entire surface (inside & outside) with white pigment ink. I used a mini pad, so I could get into all the crevices.
  • Once this was dry (about half an hour) I went back over with more pigment ink, blending VersaColour in Opera Pink with Colourbox Chiffon White. Over the top of that, I stamped with a flower stamp using Brilliance Orchid Pink.
  • Although these are different brands, they are all pigment inks and so all blended happily together.
  • I finished off with flatback "gems" in pink, plus alphabet stickers, torn vintage sheet music and a mini vintage postcard.
  • There's more collage inside, plus a pocket for business cards.
This was a private commission for the Mother of the Bride, who used it to organise everything: flowers, food, bridesmaids etc - so all the contact numbers, fabric snippets etc, were all in the one book which fitted very neatly into her handbag - and lived with her for around 8 months!

This idea might also be a good one for someone expecting a baby, a big anniversary celebration etc - anything that needs a lot of organising that you don't want mixed up with your other contacts. And it would make a fun keepsake for later - get rid of the addresses and fill up with photos.

Happy Pink Saturday!

Saturday, February 7, 2009

BIRD JOURNAL

The lovely people at Stampington have just released this gorgeous little Bird Journal by Vanessa Spencer.


Bird Journal by Vanessa Spencer
for Stampington


Here's the link for you to download the template and see the step-by-step photos too!

What a lovely project - I can see so many possiblities for this, and will be dusting off my Bind-it-All immediately! This could be made from any paper - I can imagine this in earthy handmade papers, raffia, rope twine etc ... or a heavyweight watercolour paper, white on white, stamped and embossed... Then again, there are so many absolutely gorgeous scrapbooking papers out there... Or use up all your odds and ends of card and paper by using the template (cut it out in mountboard or even the cardboard from cereal boxes) and collage on a mix of papers, seerendipity-style, then trim down.

The possibilities are endless!

Monday, January 26, 2009

THIS IS WHERE WE LIVE

Here's the most wonderful little video link I found on the web, for all you book lovers:

This Is Where We Live from 4th Estate on Vimeo.

If you loved this, you'll love the item on Su Blackwell I posted earlier on the blog:

Aren't there some wonderfully talented people out there!

As you know, I love altered books and making altered books. I feel absolutely inspired to have a go at some trees. And Spring is coming, after all...

Tuesday, January 13, 2009

IMAGE TRANSFERS

I've always been totally in love with the soft, misty look of image transfers.

One of my altered book pages
& the link for my Gel Transfer tutorial


So you can imagine I was pretty pleased to find TWO links today (posted on the Yahoo groups) which I just had to share:

Suze Weinberg is doing transfers with wax

Nitsa has some great transfer ideas on her Still Alive photography blog


Spread from my "Supermodel" altered book

I have yet to get that new camera I was lusting after (any make I've ever heard of, minimum 8 mg pixels, and preferably 10 mg pixels - and cheap) but by golly, when I do...

Monday, December 29, 2008

MORE BRILLIANT LINKS

I am always amazed at the links one can find online: here's the ultimate in altered books (you need to keep the sound on for this one, and linger on each page awhile):
Book of Numbers
and you just might like this one too (again, keep the sound on if you like 30s style jazz):


and also this promo clip by ShitDisco (although you might not like their music: Indie):


Clever, huh? The Book of Numbers is my favourite, though.

Monday, December 8, 2008

WINTER BLUES

As it's now officially Winter... and very nearly Christmas... I thought I'd upload this little gallery of artwork I did in Brenda Renoulf's altered book Winter Blues.


Gel medium and extra glitter, plus torn papers, a torn hole in the page with a spiderweb sewn in over the hole (using fibres and textured wool) plus metal confetti and eyelets.


In hindsight, I wish I had scanned the pic of the little girl; she's fabulous. It was a magazine page I have hoarded for several years, and now can't even remember the mag, or I'd buy it again.


Brenda had already applied the letters, and allowed me to add my embellishment around them: heavily-applied gesso (using a palette knife) blue glass beads, glitter, Diamond Glaze and more metal confetti.


I got to do the very last spreads for this swap, and also the cover, finishing the book.


The page before the little girl, showing a torn pocket on the left with an ATC tucked inside, and the torn holes with spiderweb effect (darned with wool fibres) plus heavy application of gesso, Diamond Glaze and glitter (and a few eyelets thrown on for luck).


Closeup of the pocket page without the ATC.


Front and back views of the ATC, with lots of German Scrap around the edges. The actual artwork is a cheat - I used stickers! (they were so sweet, I couldn't help myself) and glazed with tons of Diamond Glaze ... and yes, more glitter!


I hope this is putting you in the mood for Christmas!